S2S eReferral User Guide
Introduction
This online user guide illustrates how to use eReferral. Click on the 'topic' headings on the vertical menu bar down the left hand side of this page. If a heading has sub-topics, they will drop-down and display underneath as you click on the heading.
The manual is based on the Victorian version of eReferral however a lot of the content will also be applicable to NSW users.
Logging In
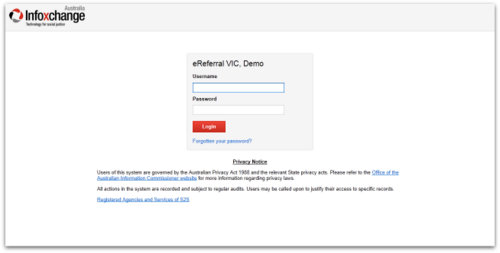
You must be a registered user of the eReferral system and you will need a username and password to login.
Setting Your Password
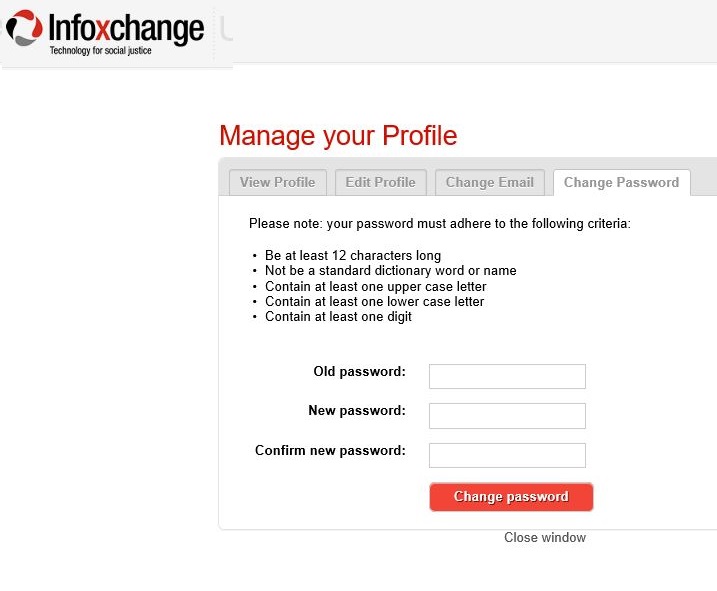
The first time you login to eReferral you will be prompted to set your own password.
-
Enter your username and initial password into the corresponding boxes.
-
Click Login.
-
Enter your initial password into the Old Password box.
-
Enter your chosen password in the New Password box.
-
Enter your chosen password again into the Confirm New Password box.
-
Click Submit.
-
You will then be taken straight into S2S.
Password criteria
All passwords must adhere to the following criteria:
- Minimum of 12 characters
- Must contain at least one UPPERCASE letter
- Must contain at least one lowercase letter
- Must contain at least one digit (e.g. a number between 0 – 9)
- Must not be based on a standard dictionary word
Please note your password expires after 6 months and you will be asked to reset it.
Basic Orientation and Tips
S2S eReferral is a web application. It has common elements to make it more user-friendly.
 Tips for Using Web Applications
- Web applications are accessed and used via a ‘web browser’. Internet Explorer is the most common web browser. Firefox, Google Chrome and Safari are also commonly used.
- Do not to use the Forward or Back buttons on your web browser. If you need to move forward or back in a web application, click on page headings, menu options and buttons to navigate and move around.
- When using web applications you generally only ever need to use a ‘single-click’ of your mouse, rather than a double-click.
- If you have clicked on something and nothing is happening – take a quick look at the web browser to see if you can see a progress circle spinning. If you can, the system is just taking a few moments to respond.
Common Page Features
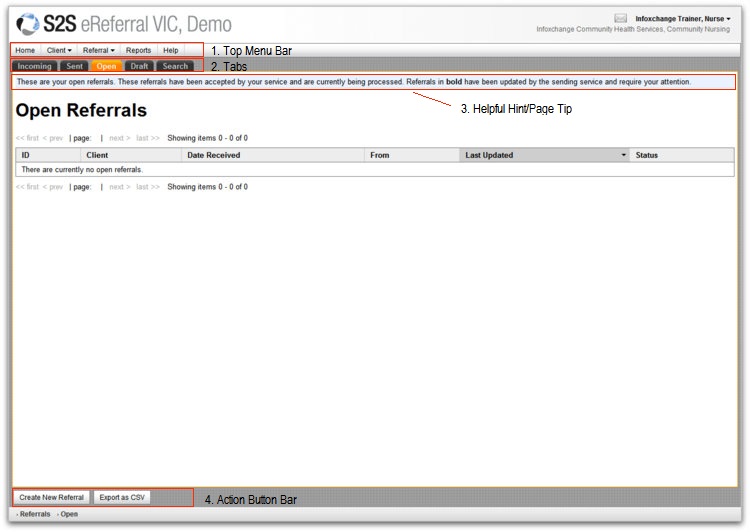
1. Top Menu Bar
This menu bar appears at the top of every page in the eReferral system. Menu headings with a black down arrow next to them indicate that they are drop-down menus and will display options when you hover over them with your mouse. Note that you don’t need to click on the menu heading – simply hovering over it will display the drop-down options.
2. Tabs
Every page you go to will have one or more tabs sitting just underneath the Top Menu Bar. Simply click on the tab you want to move to. The tab you are currently on will be highlighted in orange, the rest will be grey.
3. Helpful Hint/Page Tip
Underneath the tab headers is a light blue banner containing helpful information about the page you are on.
4. Action Button Bar
Some pages in the eReferral system have ‘actions’ associated with them – such as Save, Create New Referral, Search etc. All actions available from a particular page are located in the Action Button Bar at the bottom of the page.
User Roles
Depending on your level of access, the screens in this manual may look a little different. Users will have more or less functions available to them depending on what is required to undertake their position.
General Users
General users of the system will be given a title such as Practitioner, Case Manager or one reflecting their job title. The default name is ‘Practitioner’.
Users with this level of access;
- Receive referrals
- Get allocated referrals by the Referral Coordinator or Service Coordinator
- Send referrals
Service Coordinator
This is a mid-level co-ordination role. Service Coordinators can only view and process incoming referrals for the one service they are logged into.
Users with this level of access;
- Receive all incoming referrals on behalf of a service
- Allocate referrals to other users within the same service
- Send referrals
Referral Coordinator
This is the top-level co-ordination role for an organisation. Referral Coordinators can view and process referrals across multiple (or all) services.
Users with this level of access;
- Receive all incoming referrals for all services they have this role in / the organisation
- Allocate referrals to other users within the receiving service
- Send referrals
Multiple Roles
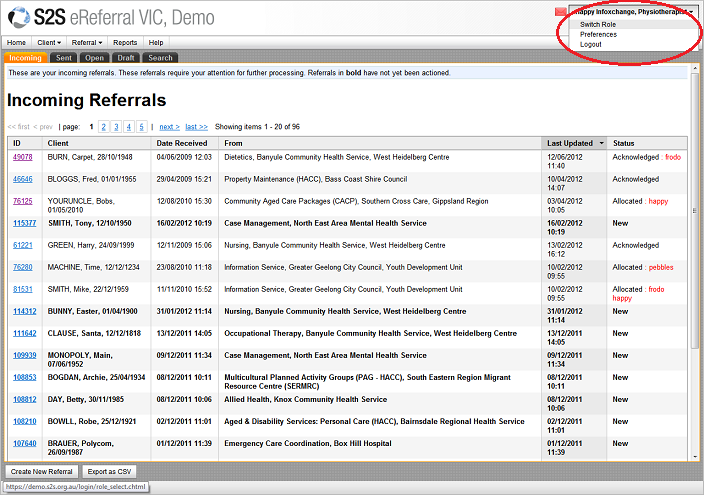
In the top right hand corner of your screen is your name, your 'role title' and the agency and service associated with that role.
You can have more than one role associated with your login. For example, you might be the Referral Co-ordinator for an Agency AND a Practitioner for a specific service of that agency. Which role you use will depend on which ‘hat’ you are wearing when using eReferral.
If you only have one role in the system, you will be taken directly to your home page after entering your username and password, and you will not have the 'Switch Role' option.
If you do have more than one role, click on the role title you want to use in the left hand column after logging in.
To SWITCH between roles;
1. Use your mouse to hover over the current role and select ‘Switch Role’.
2. This will take you back to the Select Role page.
Change Personal Details
You can change personal information such as your firstname, lastname, phone number, email address and password via Preferences.
To get into the Preferences, hover over your name in the top right hand side of your screen and select Preferences.
Click on one of the hyperlinks to:
| Change my name or phone |
|
| Change my email address |
|
| Change my password |
|
NB: If you make changes to your details, the changes will not take effect until the next time you login.
Change Preferences
You can customise some basic settings in eReferral such as your home page, name and date format and number of referrals to display per page.
- Hover over your name in the top right hand side of your screen and select Preferences.
- Scroll to the bottom of the page.
- Make your selections.
- Click Save User Account.
- Click Home (you will need to click Home twice if you changed your Home Page preference).
| Date Order |
Choose which date order to display referrals on the Incoming, Sent, Open and Drafts tabs. Most people prefer to have the most recently created or updated referrals at the top. |
| Date Format |
Choose which date format to display all dates in. Most people prefer to use Australian Standard (dd/mm/yyyy)). |
| Name Format |
Choose which name format to display all client names in. |
| Records Per Page |
Choose how many referrals per page you want to see on the Incoming, Sent, Open and Drafts tabs. |
| Home Page | Choose which page you want to be your home page. |
SCTT Forms Overview
The SCTT templates are all replicated in the S2S eReferral system so that referrals sent using S2S comply with the requirements set by the Department of Health.
The Department of Health (Victoria) published a Service Coordination Tool Templates User Guide 2009 which breaks the SCTT forms down into core, optional and supplementary templates.
Core Templates
The diagram below lists the Core SCTT templates required for a Referral on the left (as defined by the Department of Health Victoria) and the orange boxes on the right show the S2S eReferral equivalent of those forms and which step during the Create and Send an eReferral process the forms are completed.
* The S2S Confidential Referral Coversheet contains a tick-box to confirm that client consent has been obtained, and a link to the Consumer Consent to Share Information form. You are not required to send a copy of the consent form to the receiving service unless requested. However, you must ensure that the tick-box is checked otherwise the referral cannot be sent.
Search for an eReferral
To quickly find a referral that you have sent or received, search by the Referral ID.
- Hover over the Referral drop-down menu in the Top Menu Bar.
- Click Search by Referral ID.
- Enter the referral ID number and click Search.
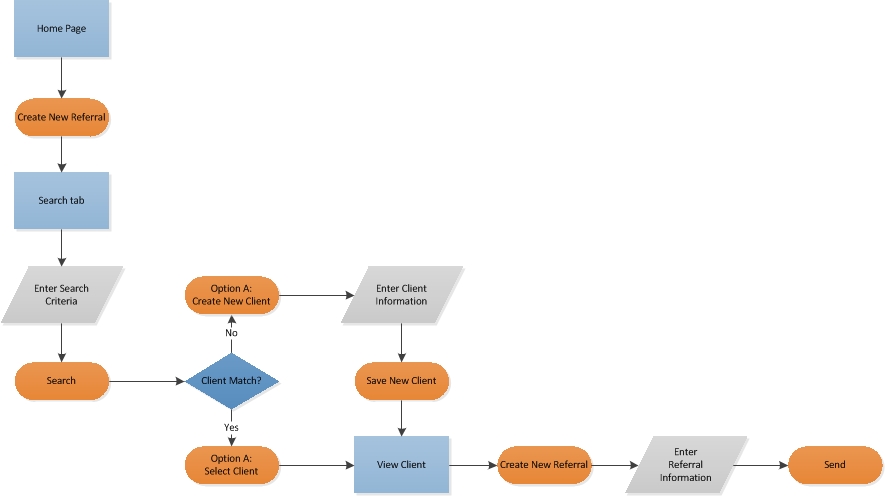
Create & Send an eReferral
Overview
There are three main steps when creating an S2S referral, however there are variables with each referral – such as which SCTT forms need to be completed. The diagram below shows you the three main steps and highlights some of the variables. The remainder of this section details how to complete each step.
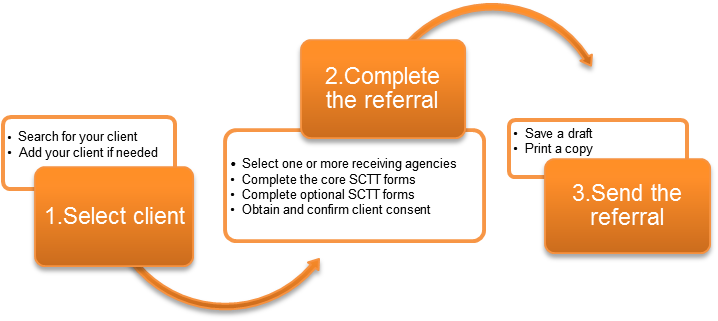
Step 1: Select Client
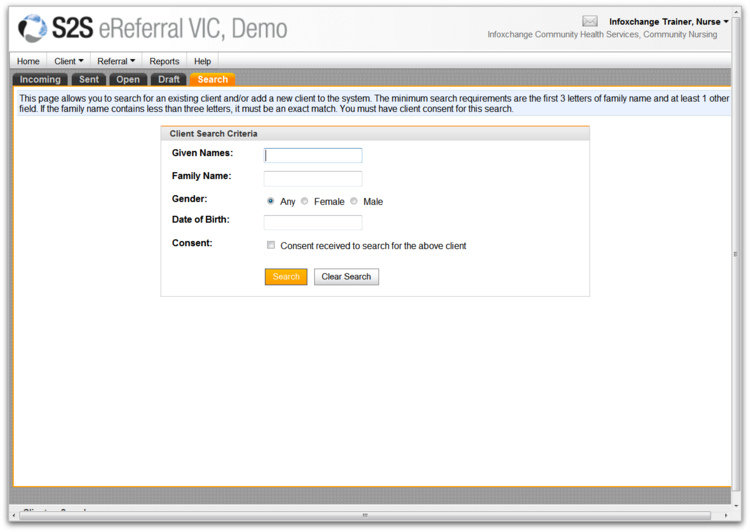
The first step is to select a client ... and it all starts with a Search!
Before creating a new referral you need to run a SEARCH to check if the client is already on the S2S system. It's important to do this so that multiple records aren't created for the same person.
If you can't find your client, you need to add them (refer to Step 1b: Add New Client).
Search for a client and create a new referral
- Go to the Client menu and select Search/New OR Click on the Search tab.
- Enter Search criteria.
- Tick the 'Consent to search for the above client' box.
- Click Search.
- A list of all clients matching your search criteria will be generated in a table underneath.
- If you can see the client you're looking for, select the client by clicking once anywhere in the row - this will open the client's record.
- Once you've selected your client, click Create New Referral from the action button bar.
- Congratulations! That's the first main step finished.
We recommend that you only use the first three letters of the given and family name as existing records may have mis-spelt names. If you're sure the client you are looking for is already in the system, try transposing the given and family name, as they may been entered like this by mistake.
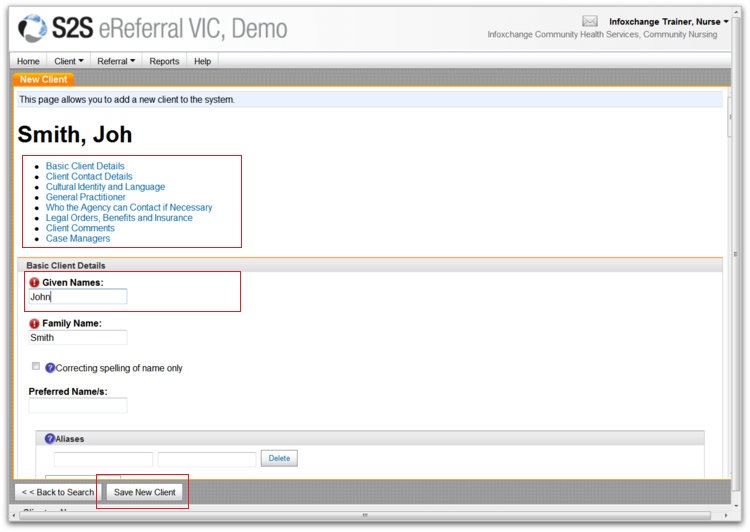
Step 1b: Add New Client
You can’t add a new client until you have done a search. Once you have run a search, there are two places you can add a new client from.
- The Search page (after you have run a Search) - select Create New Client.
- The View Client page (once you have opened a client record), select Create New Client with Same Name.
Adding and saving a new client record
- Fill in the Client details by clicking into the text boxes.
> Scroll down or use the blue hyperlinks to move down the page.
> Fields with a red exclamation mark must be completed. - When you have finished, click Save New Client.
- The client data will be saved and will load the full set of Client Record tabs. You can edit and save more client details, or add an alert if necessary.
- When you are ready, click Create New Referral.
- Congratulations! That’s the first main step finished.
Step 2: Complete Referral
The second step of creating an eReferral is to fill in the referral information.
In this step you must:
- Select a receiving agency and service.
- Obtain and confirm client consent.
- Complete or attach the core SCTT forms (Coversheet, Summary and Information) as a minimum.
- Complete or attach any optional or supplementary SCTT forms as required.
Once you have completed Step 1: Select a client, the default referral form will open. The left hand vertical menu panel displays the different sections of the referral. As you enter information in the various sections, green ticks will appear – this doesn’t necessarily mean that all the information has been completed, just that the section has been filled out to some extent.
Helpful hints for referrals
- You can select more than one receiver for the same referral.
- You don't have to complete your whole referral in one go, but you must Save As Draft first.
- It is good practice to Save As Draft at regular intervals to prevent you from losing your work in the event that your internet connection is disrupted.
- Throughout the referral sections, you can access more helpful hints by hovering over the blue&white question mark symbols with your mouse.
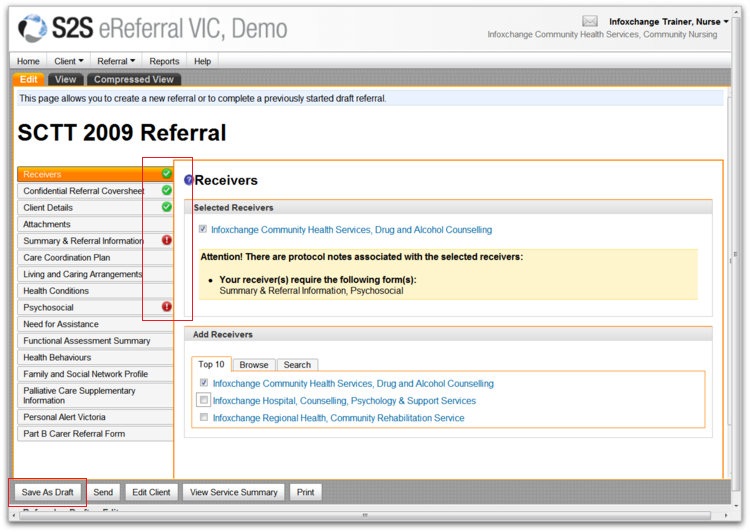
Step 2.1: Select Receiver
Referrals may be sent via the eReferral system using one of three methods.
- Standard eReferral: Electronic referral to member agencies fully registered with the S2S system.
- Fax referral: Using the FAX gateway.
- Email referral: Secure email using the PKI email facility.
eReferrals
To use the eReferral sending method, the receiving agency must be registered with the S2S system.
To select a registered agency, look under the Add Receivers heading at the first 2 tabs; Top 10, and Browse.
Top 10
Lists the 10 providers that your service has sent the most referrals to. If the correct agency/service is in this list, simply put a tick in the tick-box.
Browse
Click the Browse tab to list regions, and the S2S member agencies will appear. Tick the box next to the service you wish to refer to and it will appear in the selected receivers area above.
NB: A Receiver can specifiy protocols for 'required' information. Once a receiver is ticked, if they do have any protocols/minimum information requirements, red exclamation marks will sign-post required SCTT forms.
Fax and Email Receivers
Fax Referrals
- The fax gateway allows referrals to be sent via fax straight from the system to a direct, secure, fax number (i.e. you do not need to use a fax machine).
- Attachments cannot be sent using the Fax referral method. Any attachments will need to be faxed separately.
Email Referrals
- The PKI facility allows referrals to be emailed to services with a secure PKI facility installed. You can also use this to send referrals to the GP network and to RDNS. See RDNS and HL7 Referrals.
- Attachments can be sent using the PKI email facility.
If the agency you need to send to is NOT registered in the S2S system, you will have to go to the Search tab and use either the Fax or Email Referral method.
From the Search tab
- Enter the name of the agency you wish to search for.
- Enter the suburb (optional).
- Put a tick in the checkbox to ‘include non S2S receivers’.
- Click Search.
- A list of receivers will appear. If the receiver appears, select it, OR run another Search.
NB: Once you have found the agency/service – the eReferral system will show which method of sending is available for that particular agency. It will either show ‘External: Fax’ or ‘External: PKI’ in red next to the listing.
RDNS Receivers
To send a referral to RDNS:
- Click on the Search button from the Select Receivers area and enter Royal District Nursing Service or RDNS
- Tick the check box that says ‘Tick here to broaden your search and include non S2S receivers’.
- Click Search. Services are listed with the [External: PKI-email] at the end - ensure you select [External: PKI-email] NOT [External: Fax]
- Tick the check box next to the name.
HL7 Receivers (GPs)
To send a referral to a GP:
- Click on the Search button from the Select Receivers area and enter the name of the receiving GP. For example, Dr Heenetigala.
- Tick the check box that says ‘Tick here to broaden your search and include non S2S receivers’.
- Click Search. GPs are listed with the [External: HL7-email] at the end.
- Tick the check box next to the name.
Please note that you cannot attach documents to referrals sent to GPs.

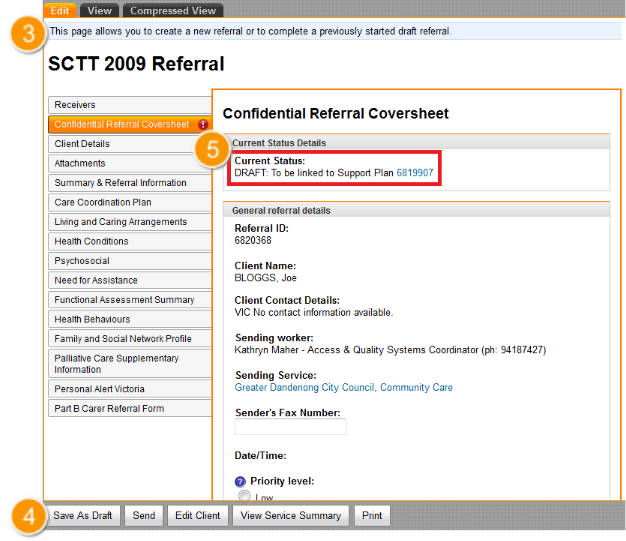
Step 2.2: Coversheet
This is a core form that contains required fields.
Regardless of whether you have your own way of producing completed SCTT forms to add as attachments, this coversheet must be filled out. To fill out the coversheet, select the second option of the left hand vertical menu panel.
The current status details of the Coversheet will show you if the referral is a DRAFT (it will be if it’s a newly created referral), or a status of a sent/received referral.
The following sections of the Coversheet are required:
1. Priority level of the referral
» Low: During peak demand, low should be selected.
» Routine: Referrals with a priority of routine will be attended to in date order.
» Urgent: Urgent suggests that the client cannot wait.
» Renewal (ACAS): This option is for ACAS assessments only.
2. Information Access Level of the referral
» Standard: The referral information can be accessed with client consent.
» Limited: Only the referral event may be accessed with client consent as the details are hidden. Users can search for the referral with client consent. They can see that a referral occurred, but cannot open it.
» Sender /Receiver Only: Only the sender and receiver can see that the referral has occurred. Any other user trying to access the referral will not find a record of it.
3. Consent
To send the eReferral, you must have gained consent from the client. You can download the consumer consent to share tool template from the Coversheet and ask the client to sign it so that you may file the form as evidence.
4. Feedback Required
This box is pre-ticked by default. You will continue to receive feedback about this referral after it has been accepted. Un-tick this box if you do not wish to receive feedback.
5. Referral Notes
Record any notes as part of the referral, such as the purpose of the referral. One sentence will suffice.

Step 2.3: SCTT Forms
SCTT forms can be completed online in eReferral, or added as attachments from your own client management system.
Online SCTT Forms
- There are ten online SCTT forms.
- The Summary & Referral Information is a core SCTT form.
- The rest are optional/supplementary.
- Simply click on the form you wish to complete and fill out as required.

Attach SCTT forms
You can add your own SCTT attachments if you have already completed them in your organisation's client management system. You will need to save the file into an appropriate format to send as an attachment prior to commencing the referral process.
- Click on Attachments from the left hand vertical panel menu.
- Click on Add New Attachment.
- Type the SCTT template name you will attach in the Label field (e.g. Psychosocial)
- Click Browse and locate the document you wish to attach.
- The ‘file’ field will automatically populate with the filename of the document you are attaching.
- Click Upload. Repeat the process as necessary. You can add as many attachments as you like.
- You can add, delete or open attachments at any time by clicking the buttons in the options in the area.
Step 3: Send Referral
The final step to creating a referral is to send it!
- Click on the Send button to complete the process.
- Click OK when you see the prompt that asks if you wish to send the referral.
- Once you have sent the referral, you can see that it was sent successfully.
- The left hand vertical panel will now only show the sections of the referral that you added information to.
- It is useful to record the referral ID number. You can enter it into your client management system, or you can print and file the referral.
- The referral will now show up in the ‘Sent’ referrals tab which can be accessed from the Home page.
NB: If you forgot to check the Client Consent tick-box, the system will display a prompt. Simply click OK and S2S will take you to the exact spot on the Coversheet form where you need to check the tick-box.
Draft eReferral
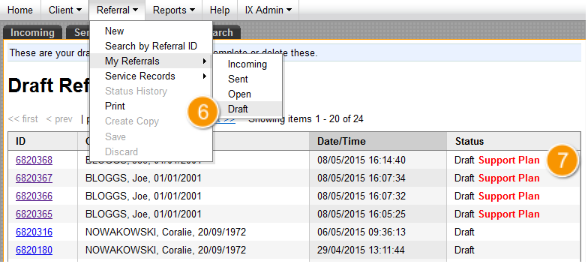
The Draft tab lists referrals that you have started, but not sent.
At any time while creating a referral and before sending it, clicking on Save As Draft enables you to come back to it to send at a later date.
From this area, a referral may be completed and sent or it may be discarded.
To complete and send the referral click on the referral from the Draft section and complete the steps remaining under Creating an eReferral.
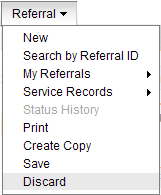
Discarding a Referral
To discard a referral, follow the steps below:
- Click on a referral in the draft tab.
- The Edit Referral page will be displayed.
- Hover over Referral menu from the Top Menu Bar.
- Select Discard
- Click OK if you wish to proceed to discard the referral. This action cannot be undone.
Send eReferral Process
Receive an eReferral
Overview
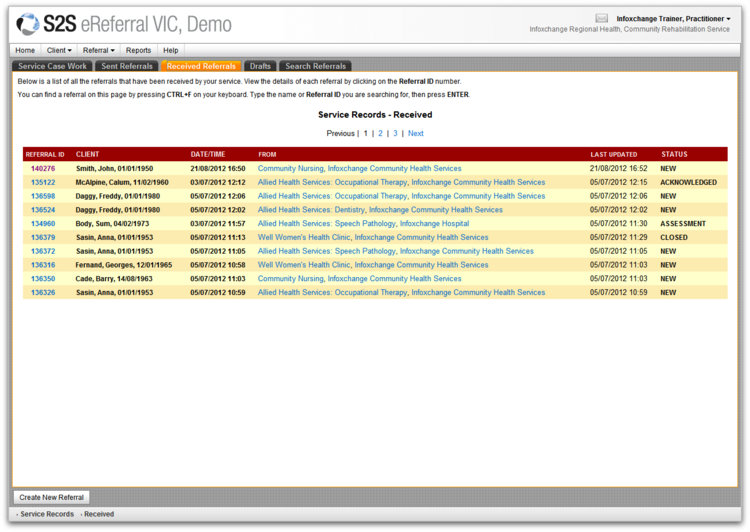
Once a referral has been sent, the referral comes into the receiving agency’s queue of referrals for processing either by a Referral or Service Coordinator. All incoming referrals will appear on the Incoming Referrals tab – which will usually be your ‘Home’ page.
If you are not a Referral or Service Coordinator, you will only see incoming referrals that have been allocated either directly to you, or to all staff members who have the same role as you.
If you are a Referral or Service Coordinator you will see all incoming referrals for the organisation/service.
A Referral or Service Coordinator will have first responsibility for;
- Acknowledging the referral
- Allocating the referral – either to an individual practitioner or to all practitioners who have the same role (e.g. Occupational Therapy, Case Manager).
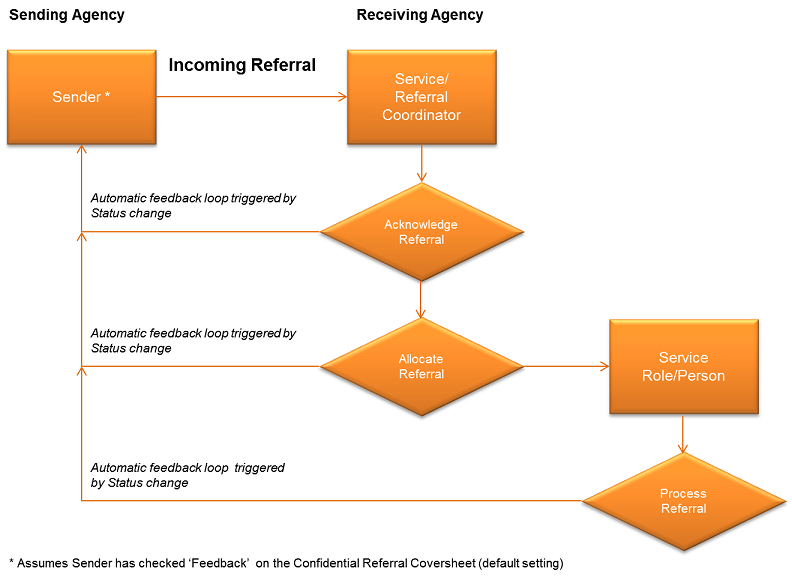
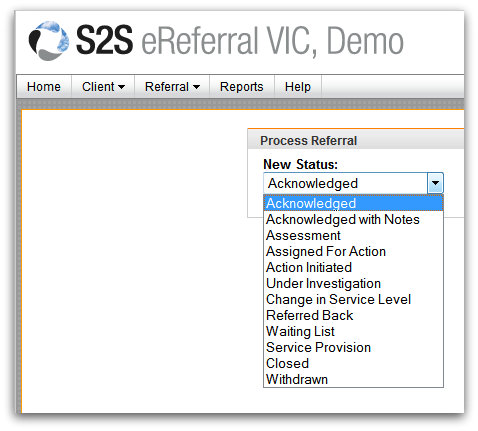
Acknowledge an eReferral
For Referral or Service Coordinators only
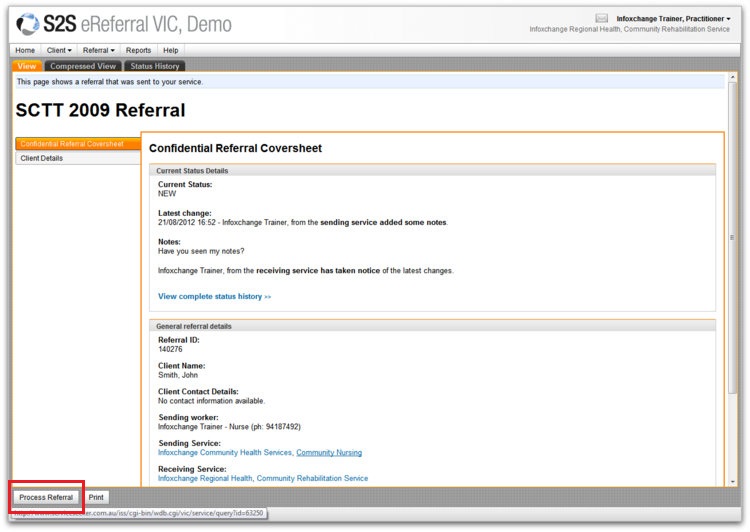
- Click on a referral with a status of New.
- Click Process Referral.
- Select Acknowledged from the drop-down menu.
- Add any Notes that may indicate to the sender how you plan to deal with the referral.
- Click Save.
- The Current Status will be updated to show ACKNOWLEDGED
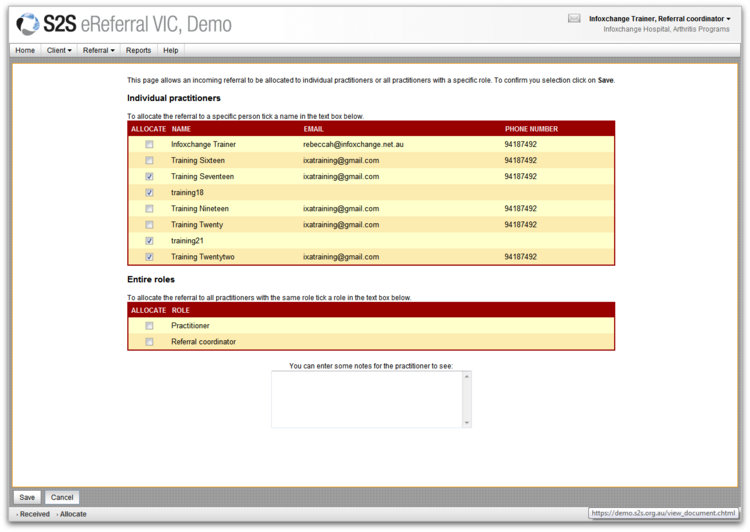
Allocate an eReferral
For Referral or Service Coordinators only
- Click on a referral with a status of Acknowledged.
- Click Allocate
- Select either an Individual Practitioner OR a Role to allocate the referral to.
- Add Notes for the sender how you plan to deal with the referral.
- Click Save.
Closed eReferral Statuses
You can continue to change the status of open referrals by following the same steps as in Accepting an eReferral. However under the Status options are three statuses which effectively ‘close’ the referral and remove it from the Open Referrals tab.
They are;
- Referred Back (returns the referral to the sending service)
- Closed
- Withdrawn
Once a referral is closed, it will be visible in Service Records. Service records provide you with a list of referrals that have been received (or sent) in the past 12 months from, or to, anyone in your service regardless of their status.

Process an eReferral
For Individuals or Roles that have been allocated a referral
Once a Referral has been allocated to you, you need to process a referral accordingly. Once the Status of the Referral has been changed from Allocated to something else, it is considered an Open referral and will move to the Open Referrals tab.
- From the Incoming Referrals tab, click on a Referral that has been allocated to you.
- Click Process Referral.
- Select the relevant status from the drop-down list (e.g. Assessment)
- Fill in any additional boxes that appear, such as Dates, Notes etc. Add attachments if you need to.
- Click Save.
- The Current Status will be updated.
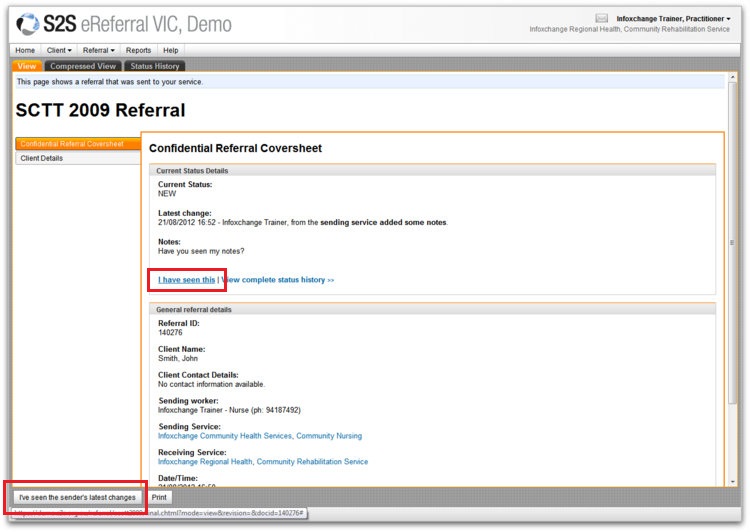
Sender Notes
If you have receive a referral that has SENDER NOTES after the status of the referral, the sender has added extra notes associated with the referral after it has been sent.
Process Sender Notes
- Click on a referral marked with Sender Notes next to the status.The referral will be displayed with the most recent notes at the top of the page in the ‘Referral Status’ box.
- To view any associated attachments or previous notes click on the Status History tab. All sender notes will be listed sequentially on the ‘Status History’ page.
- To return to the referral, click on the View tab. The referral will once again be displayed.
- Before you can process the referral further, you must ‘Acknowledge Sender Notes’

Receive a HL7 Referral
GP Referrals are made via the Medical Director system. Referrals you receive from the Medical Director system will have HL7 next to the status and (Not an S2S Client) next to the client name.
Similar to an RDNS Referral, before doing anything you must :
- Assign the HL7 client to a client in the eReferral system. (refer below and follow link to appropriate sub-heading once you have completed step 5)
- Link the GP name prior to acknowledging the referral (refer to Rename Sender)
Assign an HL7 Client to an S2S eReferral Client
- Click on the row of the HL7 Referral you want to open.
- Scroll to the bottom of the page and open the attachment with _LETTER.rtf at the end of it.
- Leave this attachment open as a reference.
- Scroll back to the top of the page of the Referral.
- Click on the Assign One hyperlink next to the client name.
If the client is NOT an existing client in the eReferral system; click on Assign to a New Client sub-heading from the left-hand vertical menu bar.
If the client IS an existing client in the eReferral system; click on Assign to an Existing Client sub-heading from the left-hand vertical menu bar.


Rename Sender
Once you have assigned the client to a client in S2S, the (Not an S2S Client) will disappear from next the client name.
The second step is to link the GP name to the referral (refer below)
Rename Sender
- Click on the Rename Sender button.
- Refer to the _LETTER.rtf document that you opened previously.
- Locate and select the name of the GP in the document.
- Copy the GP's name *
- Paste the GP's name it into the Practitioner name field.
- Click Submit.
* It's important that the GP name you enter into S2S is exactly as it appears in the LETTER.rtf attachment, therefore we recommend you copy and paste to ensure an exact match.


Receive an RDNS Referral
The RDNS is not a registered agency of the S2S eReferral system. Therefore, if you receive a referral you receive from RDNS, it will have (Not an S2S Client) next to the client name. Before doing anything, you must assign the RDNS client to a client in the eReferral system.
Assign an RDNS Client to an S2S eReferral Client
The RDNS referral will arrive saying Not an S2S Client because the client record that accompanies the referral is not generated from an S2S eReferral client record and instead arrives as an attachment. However, this does not necessarily mean that the actual client doesn't have a client record in eReferral. Therefore before you process an RDNS referral, its a good idea to know whether the client does have a record in eReferral as you will need to either Assign to an Existing Client or Assign to a New Client record. This will help you work out what you need to do once you get past step 5 below.
- Click on the row of the RDNS Referral you want to open.
- Scroll to the bottom of the page and open the attachment with a series of figures and SCTT09.txt at the end of it
- Leave this attachment open as a reference.
- Scroll back to the top of the page of the Referral.
- Click on the Assign One hyperlink next to the client name.
If the client is NOT an existing client in the eReferral system; click on Assign to a New Client sub-heading from the left-hand vertical menu bar.
If the client IS an existing client in the eReferral system; click on Assign to an Existing Client sub-heading from the left-hand vertical menu bar.
</p>")

Assign to a new client
If the client is not an existing client in the eReferral system;
- Click on the Assign to a new client tab.
- Fill in the client record using the information contained in the SCTT09.txt attachment that you opened in step 2.
- Click Save when you have finished.
- The client will be saved and the RDNS referral will be assigned to the client in the Referral History area.

Assign to an existing client
If the client is an existing client in the eReferral system;
- Click on the Assign to an existing client tab.
- Check the circle next to the family name to ensure the details that appear below that match up with the information contained in the SCTT09.txt attachment that you opened in step 2.
- Click on Save to link the RDNS referral to the client.
eReferral Status History
After a referral has been sent or received, you can check its status using the Status History tab.
This will give you a list of actions that have occurred on a referral.

eReferral Feedback Loop
Once you have sent a referral you will receive email notification of Status changes that have been made by the receiving service for your client (refer to Incoming Referrals). Initially they will Acknowledge receipt of your referral and then most likely Allocate the referral to the most appropriate team or individual.
To view the Notes regarding status changes, log in to the system and Search for the referral (see Search for Referral). The Referral ID number is in the email.
Once you have read these notes, you must click on the "I’ve seen this" hyperlink either in the body of the Coversheet of the referral, OR from the Action Button Bar.
Adding a Note
Add Note allows either the sender or receiver of a referral to add a note and trigger a notification email to the other party.
Follow the steps below to add a note to a referral.
- Open the referral you wish to add the note to.
- Click on the Add Note button at the bottom of the page. The ‘referral add note’ page will be displayed.
- Add any notes or attachments associated with the referral (refer to 2.3 SCTT Forms for more information regarding adding attachments).
- Click on the Next button. An email notification will be sent to the other party involved with the referral.
You will then be returned to the view page where your notes will be displayed in the ‘Current Status Details’ at the top of the page. The notes and any attachments will also be available from the ‘Status History’ page. This process can be repeated any number of times.
Note: For referrals sent by fax or PKI email, this can be used to make notes regarding the progress of the referral or to record any other information necessary for your own purpose, however no notification is sent.

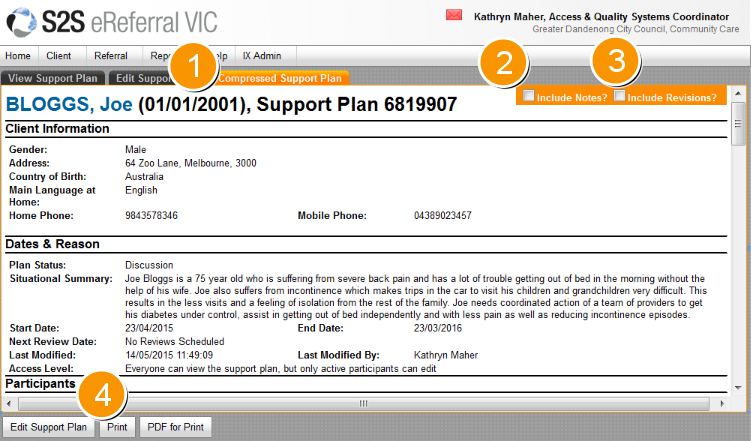
Print an eReferral
To print ONE section of the referral
- Click on the section you want from the left hand vertical menu panel.
- Click Print from the Action Button Bar and select printer as normal.
To print the WHOLE referral (recommended)
- Select the Compressed View tab.
- Click Print from the Action Button Bar and select printer as normal.
NB: The Referral ID changes when its moves from being a ‘Draft’ referral to a ‘Sent’ referral, so if you want to keep a paper copy of the referral, make sure you print the ‘Sent’ referral as it will display the correct Referral ID for future use.
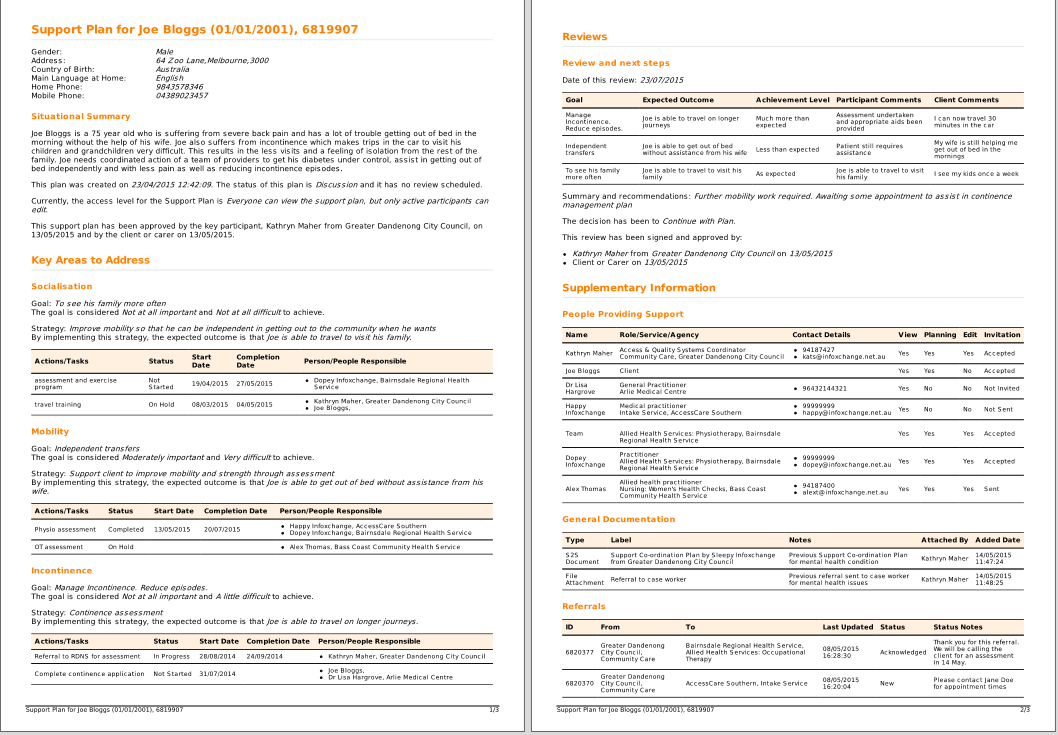
Support Plan
Overview
Support planning facilitates inter-agency service coordination for clients with complex or multiple issues.
S2S Support Plans allow you to:
- Choose services and practitioners involved in the client’s plan;
- Control Edit/View permissions for the plan;
- Define goals, strategies, tasks and desired outcomes;
- Schedule reviews to evaluate goals and client progress;
- Attach supporting documents (eg. diabetes management plan);
- Link to a new or existing S2S eReferral (and SCTT forms) for that client;
- Track changes and activity
- Send notifications to Support Plan members
Step 1: Create a Support Plan
There are seven main steps when creating an S2S Support Plan:
- Search / Add Client
- Create Support Plan
- Record the reason for the Plan
- Invites Participants and Support Providers to the Plan
- Link or add documents and referrals
- Determine the goals you want acheived
- Review progress
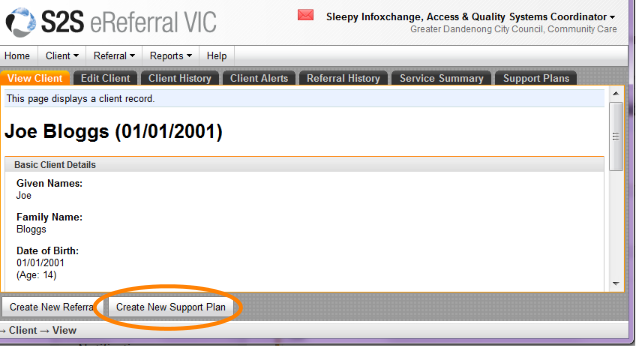
Once you are viewing a client on your screen, click on the 'Create New Support Plan' action button at the bottom of your screen.
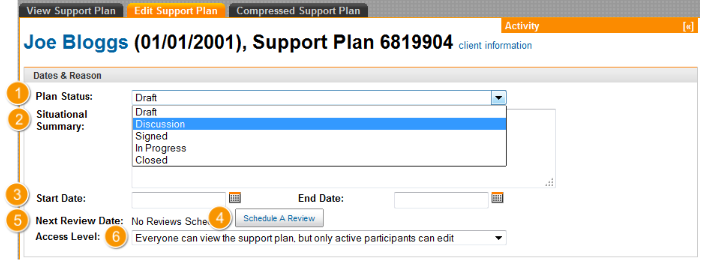
Step 2: Add Dates and Reasons
Dates and Reason Section
1. Plan Status: Select a status from the drop-down list. This can be updated as the Support Plan progresses
2. Situational Summary: Enter the reason for creating the plan
3. Start Date / End Date: There are date picker fields for selcting the start and end dates of the plan
4. Schedule a Review:
- Click on 'Schedule A Review'
- Select the participant responsible for the review
- Select the target date
- Click 'Add'
5. Next Review Date: This links to the reviews section of the support plan. Multiple review dates can be added to a plan, however only the 'Next review date' will display in the the Dates and Reason section of the support plan
6. Access Level: Select the desired Access Level from the drop-down list. This can be changed at a later date, but only by a participant with 'edit' access for the support plan.
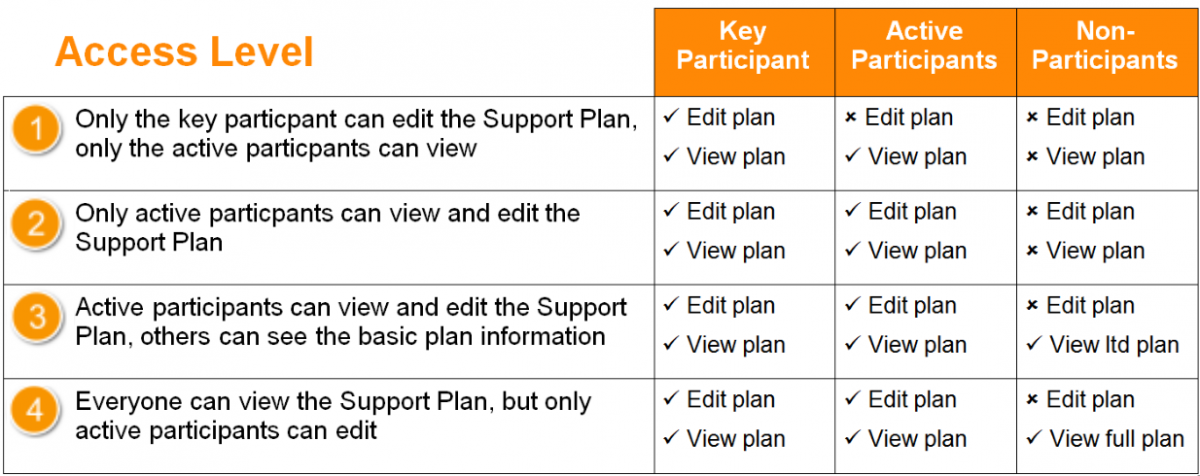
Access Levels
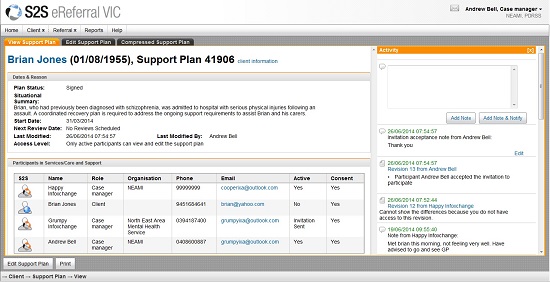
The Support Plan is designed to span across multiple practitioners and services therefore a key part of setting up a new Support Plan is to define permissions and access levels;
- who will be involved;
- what their ‘role’ will be; and
- what their Access Level is.
Any participant with edit access to the Support Plan can set the Access Level and determine who can view and edit the plan based on the type of particpants they are. This is usually the Key Participant. The Key Participant can always Edit and View the Support Plan
There are four access levels:
Access Level:
- Key Participant Edit: Only the key participant can edit the support plan, only active participants can view.
- Private: Only active participants can view and edit the support plan
- Limited View: Active participants can view and edit support plan, other can see basic plan information
-
View: Everyone can view support plan but only active participants can edit
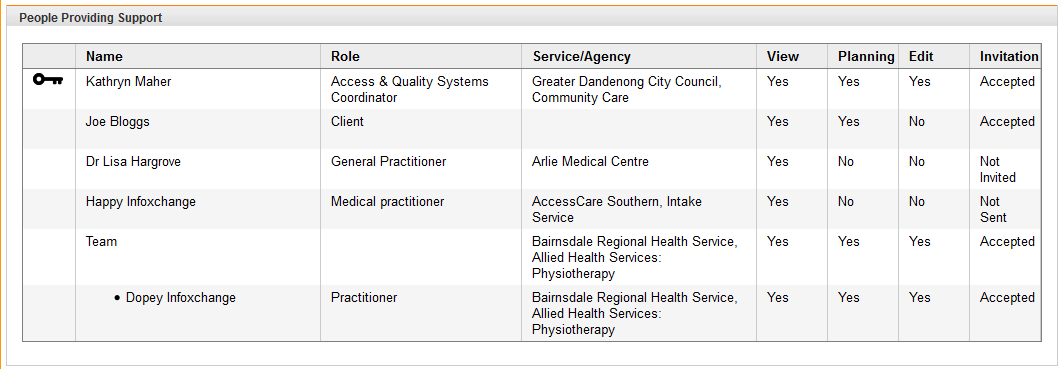
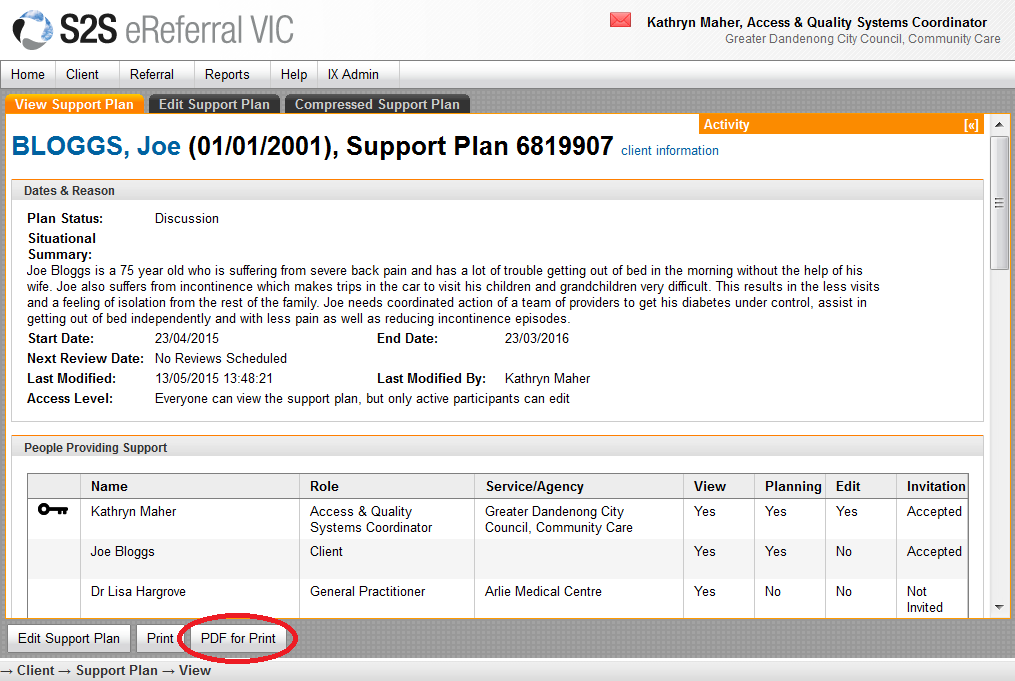
Step 3: Manage Support Providers List
People Providing Support
Participants can include all the people involved in providing support to the client, but are not necessarily a reflection of everyone who will be providing care to the client. Participant(s) can be both from within your organisation or from a different organisation. Either way, the person(s) must be a registered ‘user’ of the eReferral system.
There are three types of people providing support:
1. Key Participants
- There can only be one key participant for a Support Plan.
- The person who creates the new Support Plan is automatically the key participant, however this can be changed to another participant if required.
- The key participant can add active and non-active participants to the Support Plan.
2. Active Participants
- There can be multiple active participants and there is no limit to the number of active participants on a Support Plan.
- Active participants can add other participants to the Support Plan but only if they have been given edit access to the plan by the key participant (see Access Levels).
3. Inactive-Participants
- There can be multiple inactive-participants with no limit to the number.
- Inactive-participants are people or services that have been added to the support plan but are unable to have direct input into the plan.
- They either have not been granted edit access or they are external participants (non S2S members)
-
Examples of inactive participants are:
- people or services that are s2s members but who have either not been given access, or not yet accepted an invite to a plan
- external GP's that do not have access to the eReferral System
- the Client
-
The client's carer
Permissions
View
Permission to view or have access to the support plan is given by the client. If the client consents for a individual/service to view the support plan, view will be set to 'Yes'. Both internal (S2S members) and external (non S2S members) can have 'View' permissions, however only S2S members can access the support plan online. Non S2S members must be sent or printed a copy of the plan to view. Support plan participants are also able to record whether a non s2s member has received a copy of the support plan and when the last copy of the plan was sent.
Planning
The person who Adds another support plan participant can choose to allow that individual/service to have planning permission.
Edit
A person who has planning permission will have edit access to the plan if the Access Level of the plan is levels 2, 3 or 4 and the participant is an S2S member.
Invitation
The person who Adds another support plan participant can choose to send an invitation and has the ability to write an invitation note. Support plan participants are also able to record whether a non s2s member has accepted an invite.
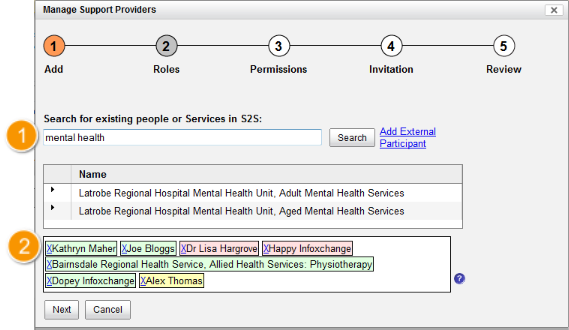
Add a new Participant
Participants are the people who will be either given access to a client’s Support Plan or who will have some involvment in the client's care. There are three types of participants and these are explained in the section called 'Manage Support Providers List'. To add a new participant, follow the workflow steps in the Manage Support Providers dialogue. These steps are broken down into:
1: Add
Add an S2S Member
1. When adding a new participant to the support plan, you may enter the name, organisation or service that you want to search for
2. It will display a search results list.
3. From this list, you can select a row to either invite a whole team or an individual from within an agency and service.
4. You can add as many participants as you like.
Add a Non S2S Member
You can also add non S2S members to the participant list.
5. Click on the 'Add External Participant' link next the the 'Search' Button
6. type the details of the non S2S participant
7. Click 'Add'
Once you have added all the participants you would like to add, click next. Dont worry if you dont invite everyone at once, you can always come back later and invite more participants.
2: Define the Role
Once you have selected the individual(s) and/or service(s) to add as participants of the support plan, you can edit the name of their role. The system will automatically populate the individuals role that has been allocated to them by their managers or by the system. You have a choice to leave the role as it is, or update it to more acccurately reflect the role they will have in this support plan.
If you update the role of a service/team, it will update the role for all the individuals in the team. If you would like different individuals from within a team to have different roles, leave this field blank. Once they have accepted the invitation, you can always update those individuals' roles later.
Click on the 'Next' button to continue to the permissions section.
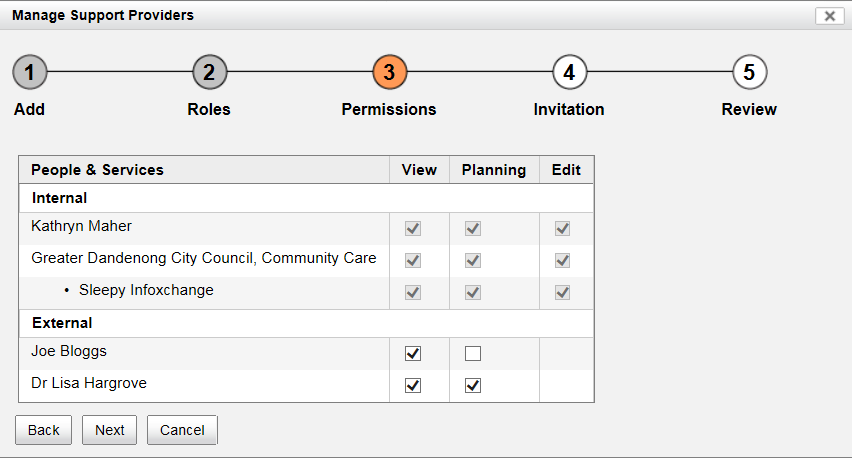
3: Set Permissions
The Support Plan is designed to span across multiple practitioners and services therefore a key part of setting up a new Support Plan is to define permissions and access levels. There are 4 access levels and these are set at the top of the support plan usually at the commencement of the plan. Although these cannot be set whilst managing the permissions of newly added participants, it is important to note that the access level that has been set in the plan will effect the behaviour of the added participants in the permissions step of managing the support provider. Access levels are explained here.
By default, the key participant and the client are added to the plan and their permissions are automatically set by the system. The key participant always has view, planning and edit access and full access for this individual cannot be removed unless a different key participant is selected. The external participant will automatically have view and planning permission as they will be viewing and participating in their own support plan. These permissions can however be removed by participants with edit access to the plan.
View
Internal People & Services
Internal people and services are S2S eReferral members who have a log in and access to the eReferral system. These added participants can now be allowed to view the support plan. This means that they have been given permission by the client to view the plan and can look up the plan in their system by entering in the Support Plan Identification number. Allowing an internal person to view, enables the planning tick box. This means that a participant with edit access can now chose to allow that newly added person or service to be involved in the planning process of the support plan.
External People & Services
External people and services are not members of the S2S eReferral system and so selecting the option for them to view the support plan means that they have been given permission by the client to view the plan, but are unable to log in and view it online. It is up to the S2S member (internal) participants to fax/email/post the external people and services a copy. A record can be kept on when the last copy was sent to the external participant. To find out how to do this, go to the section on 'Editing Contact Details' on this page.
Planning
Internal People & Services
Ticking the planning check box means that you are allowing the internal person or service to actively participate in the support plan. With the right access level set on the plan (Access level 2, 3 or 4), the participant with planning ticked, will automatically be given permission to edit the support plan.
External People & Services
Ticking the planning check box means the external person or service is participating or will participant in the support plan. Because they do not have a log in and cannot view/access the plan within the eReferral system, their participation in the planning process is recorded by an S2S member on their behalf and updates to the plan are sent to them via fax/email/post. A record can be kept on when the last copy was sent to the external participant. To find out how to do this, go to the section on 'Editing Contact Details' on this page.
Edit
Only S2S members can have edit access and edit access to the plan is determined by the access level, planning permission and whether they have accepted the invitation to join the support plan. The permissions step displays whether the people and services have been granted permission to edit the support plan.
4: Invitation
The invitaiton step of adding participants to the support plan displays the current invitation status of the participants and allows you to select participants to send an invitation to. The key worker and the client are pre-populated with 'accepted' under their invitation status. Only Support Plan participants that have been given planning permission can be sent an invitation.
Internal people and services
Newly added participants are automatically ticked to send an invitiation if they are S2S members with planning permission. You can chose to untick the send invitaiton check box if you would like to refine the plan more before sending an invitation.
External people and services
You can edit the client's invitation status manually to 'Not invited', 'Invited', 'Accepted' or 'Declined'. The invitation status of any external participant that has been given planning permission can also be manually selected.
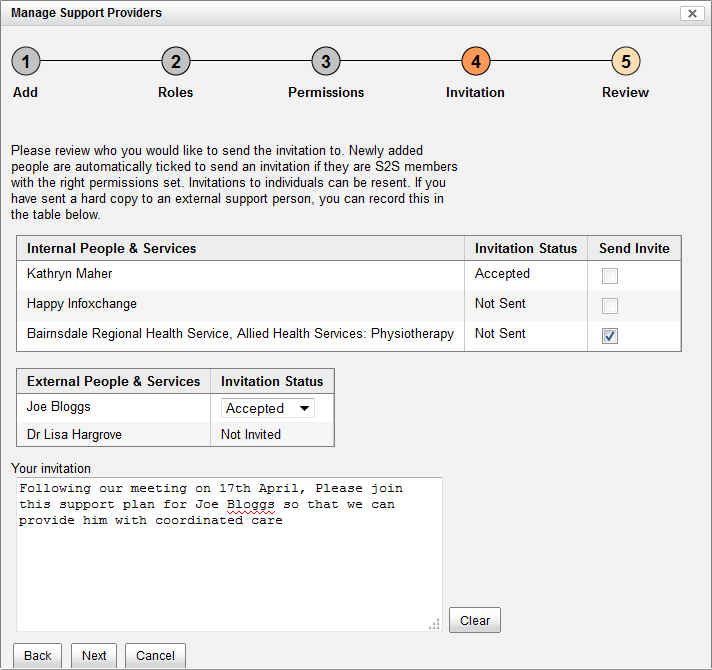
Sending an Invitation
If you chose to invite an Internal participant(s) to join in the support plan discussion, you will be able to write them an invitation note that they will receive it in their email inbox as well as in their red envelope in the S2S eReferral system shown at the top right of the screen next to their name.
Note: You will need to finish and then 'Save Support Plan' before the invitation is sent.
Red envelope example
Email Example
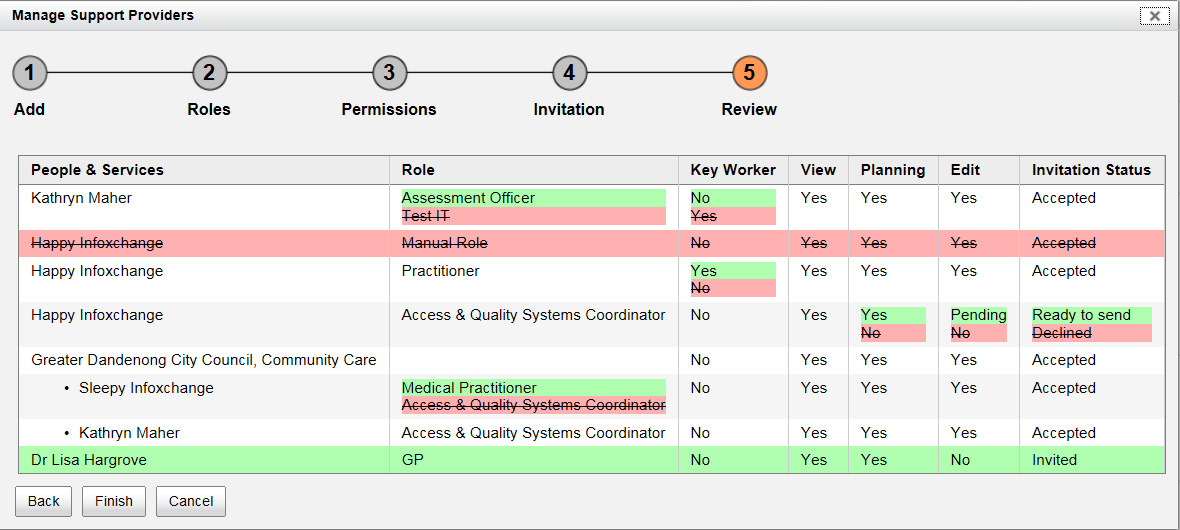
5: Review
Once you have added new support plan participants, you have the opportunity to review the added participants. This step summarises the selections you previously made and all newly added participants are highlighted in green.
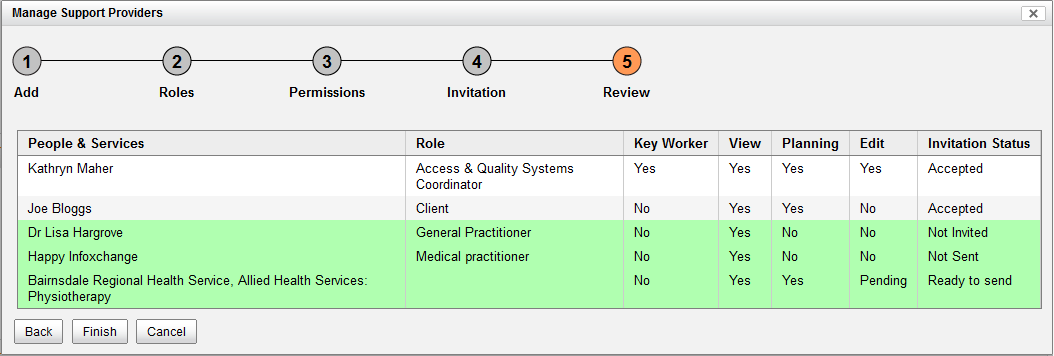
Edit Participant List
You can manage your support provider list by clicking on the Manage button under the 'People Providing Support' table.

This diaplogue box allows you to perform the following:
1. Edit Participant
You can manage your support provider list by clicking on the 'Manage' button below the people providing support table.
- To add a new participant type in the search field the name of the person, agency or service and click search
- To remove a participant, click on the cross next to their name in the box below the search results.
Participants listed in the selection box are colour coded to indicate the status of an invitation.
- Green - Accepted
- Amber - Invited (but not yet accepted/declined)
- Red - Declined
- Grey - Ready to send (but you have not saved the support plan)
- White - Just selected
2. Edit Role
- For participants who are individuals and who have already accepted the support plan invitation, you can now give them the role of key worker by selecting the radio button under the key worker column in the row of their name.
- You are also able to rename the role of a participant of the support plan to more accuratly display their role in the support plan.

3. Edit Permissions
Once an S2S participant (Internal participant) has accepted an invitation to join a plan, you can no longer edit their permissions.
You can edit the permissions of non S2S (external participants) at any time.
4. Edit Invite
The invitaiton step of adding participants to the support plan displays the current invitation status of the participants and allows you to select participants to send an invitation to. Only Support Plan participants that have been given planning permission can be sent an invitation.
Internal people and services
If an invitation has not yet been sent, you are able to edit the invitation message here before sending. It is important to note that the same message will be sent to all participants that have the 'Send Invite' check box selected.
External people and services
You can edit the client's invitation status manually to 'Not invited', 'Invited', 'Accepted' or 'Declined'. The invitation status of any external participant that has been given planning permission can also be manually selected.

5. Review your edits
Once you have made all your edits, you have the opportunity to review the edit participant details. This step summarises the selections you previously made:
- New changes are highlighted in green
- Old items are crossed out and highlighted in red
Step 4: Link or add General Documentation
Add General Documentation relating to the Support Plan
As a support plan participant with edit access, you are able to add general documentation relating to the support plan. You can add an S2S record, an attachment, or a link
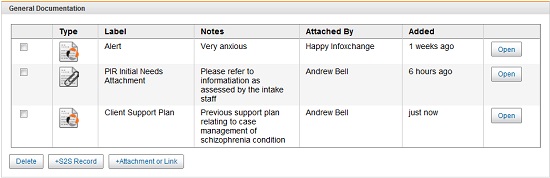
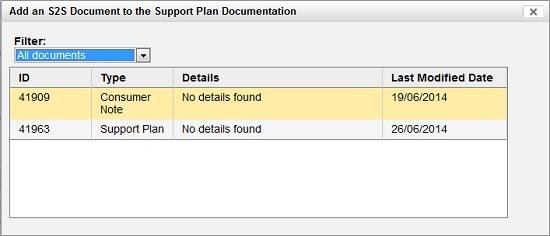
Add S2S Record
Click on '+ S2S Record' to add an alert or another support plan
Add Attachment or Link
Click on '+ Attachment or Link' to add an external document or link relating to the support plan
Browse to the location on your hard drive

Add some notes regarding the attachment

Click 'Ok'
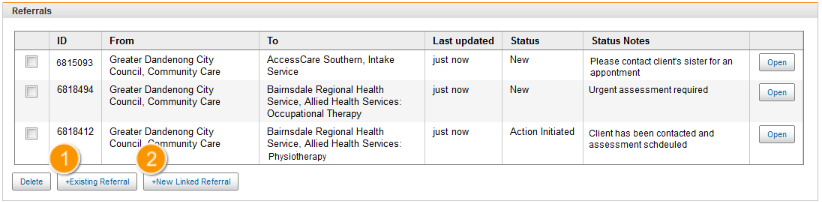
Step 5: Link eReferrals
Support Plan participants with edit access can
- Link previously created eReferrals to the support plan by clicking on the '+Existing Referral' button
- Create new linked referrals whilst in the Support plan by clicking on the '+New Linked Referral' button
Add an Existing Referral
Once you click on the '+Existing Referral' button, a dialogue box will appear which will list all previously created referrals for the client of this support plan.
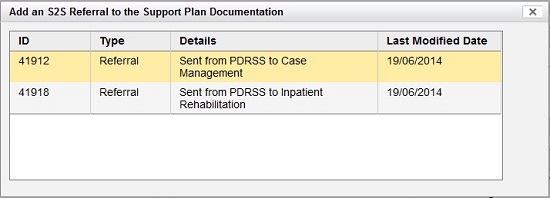
Click on the row of the referral that you would like to link to this support plan.
You can do this for as many referrals as you like.
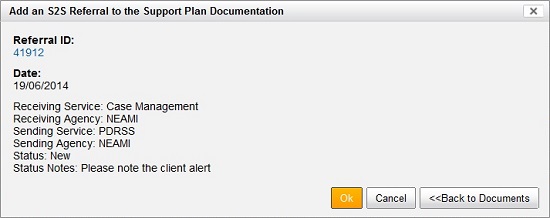
Click 'Ok' after reviewing the details
Create a new Linked Referral
1. Make sure you save any changes to the support plan before you click on the '+New Linked Referral' button.
2. Clicking on the '+New Linked Referral' button will bring you to the edit referral screen.

3. Edit the new referral as explained here.
4. Ensure you save it as a draft along the way
5. Note that Referrals created from within support plans display the linked support plan in the coversheet under it's status.
6. You can find your draft linked referral under your drafts tab
7. It states clearly in the status if it is linked to a support plan
8. Once the referral is sent, you will be brought back to the support plan and at the top in orange, it will tell you that your referral was sent successfully and linked to the support plan.
9. You will now see the referral listed in the referrals table of your support plan

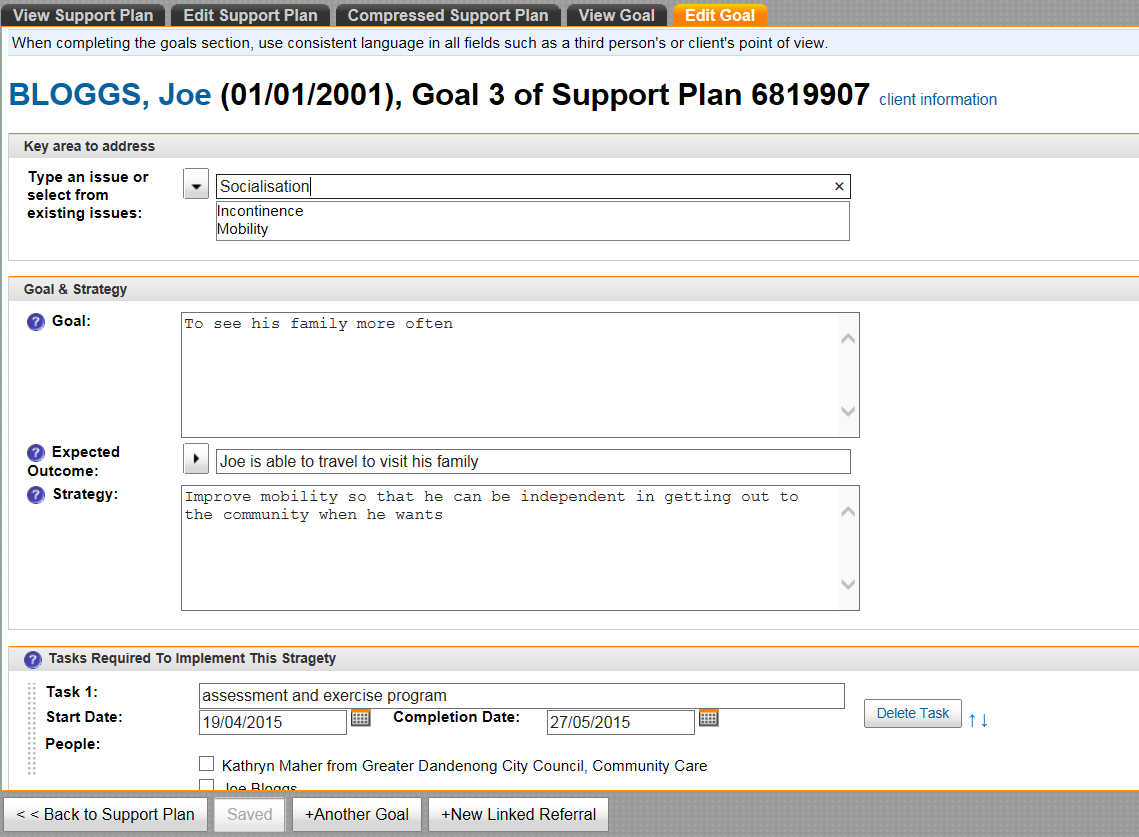
Step 6: Goals
Add or Edit Goals in your Support Plan
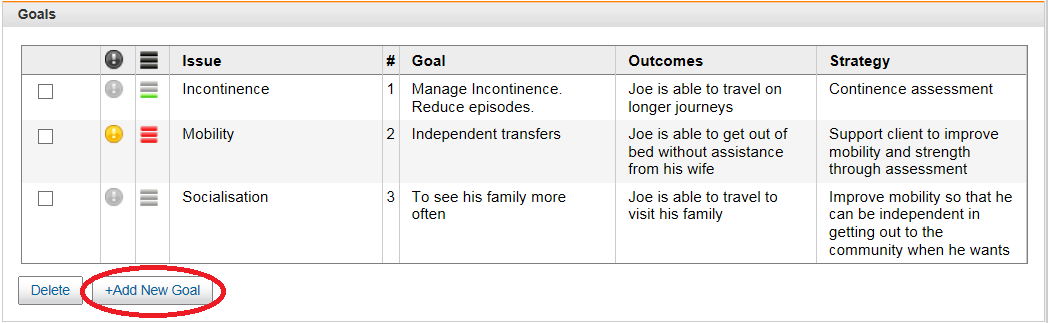
- Click on '+ Add New Goal' to add a new Goal to your support plan
- Click on the row of an existing goal to view and/or edit that goal
- Tick the check box in the row of the goal you would like to delete and click on the 'Delete' button to remove the goal from the Support Plan
Complete Goals
When adding goals to a support plan you should complete the following sections:
- Key area to address
- Goal
- Expected outcome
- Strategy
- Tasks
- Goal Rating
How to complete a Goal

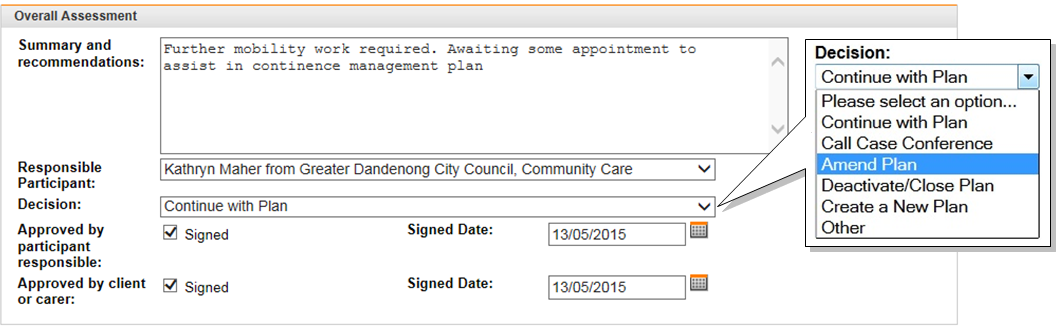
Step 7: Record of Approval
Approval
The approval section is where you record:
- When the Plan was approved by the key participant
- When the Plan was approved by the client or carer

If the key participant has approved the plan and a different key participant is then selected, the approval will clear and it will need to be re-approved by the new key participant.
The key participant is identified in the 'People providing Support table' by a key symbol

Step 8: Reviews
A Support Plan participant with edit access can:
- Add a new review by clicking on '+ Add New Review' button
- Edit an existing review by clicking on the row of the review they want to edit
- Delete a review by selecting the check box on the row of the review they want to delete and clicking on the 'Delete' button

Add a Review
When the Support Plan participant clicks on the '+ Add New Review' button, a pop up will appear asking them to complete:
- Participant responsible for the Review
- The Target Date of the Review

Once a review is added, it will appear in the list of Reviews table.
Edit a Review
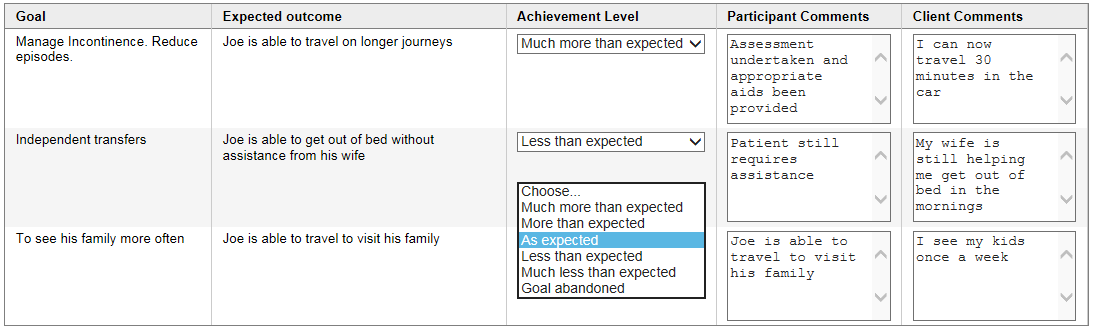
When completing a review, the Reason, Goals and Expected outcomes of the Support Plan are automatically completed for you.
A Support Plan Participant with edit access can click on the row of the scheduled review and edit the following:
- Review date
-
Goal Reviews:
- Achievement Level of each Goal by selecting from a drop down list
- Participant Comments regarding each Goal
- Client Comments regarding each Goal
- Summary and Recommendations
- Person responsible for the Review
- Final Decision by selecting from a drop down list
-
Approvals
- Participant approval date
- Client approval date
Completing Achievement Level, Participant & Client Comments section
Completing the Overall Assessment Section
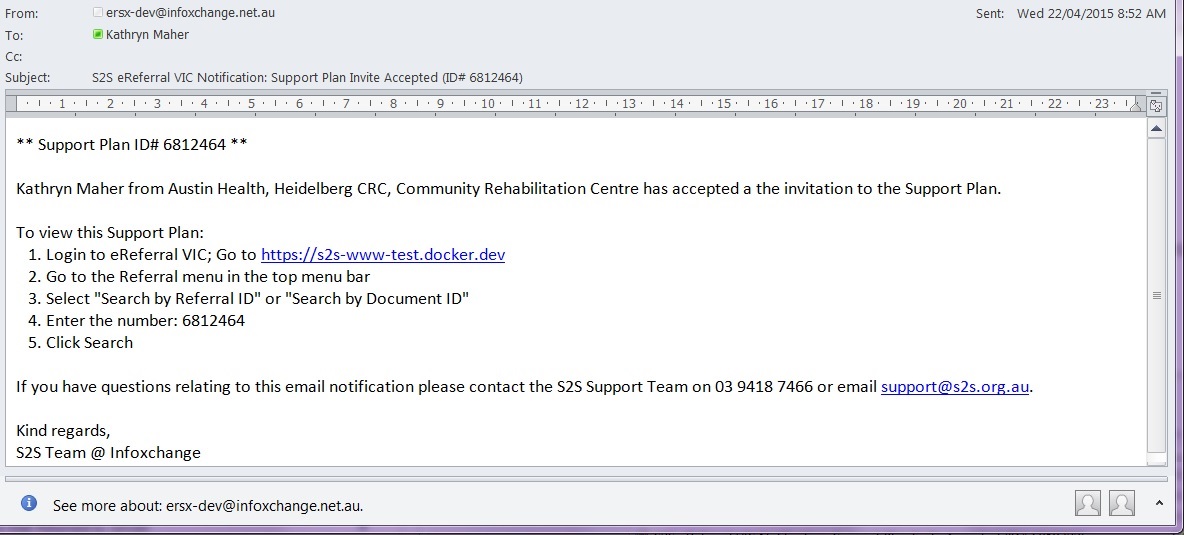
Notifications
Email Notifications
Email notifications get sent out to support plan participants automatically under the following circumstances.
- A new/existing participant is sent an invitation to join in the plan
- The inviter receives an email notifying them of the newly invited participants response to their invite (Accept / Decline)
- A review of a support plan that you are participating in is due to occur within the next 10 working days.
- When a participant who is editing the plan clicks on the 'Save Support Pan & Notify' button
-
When a participant who is editing the plan clicks on the Save & Notify buttons in the following sections:
- General support plan - 'Save Support Pan & Notify'
- Activity notes - 'Add Note & Notify' / 'Udpate & Notify'
- Goals - 'Save Goal & Notify'
- Reviews - 'Save Review & Notify'
Example of an email notification

Red Envelopes
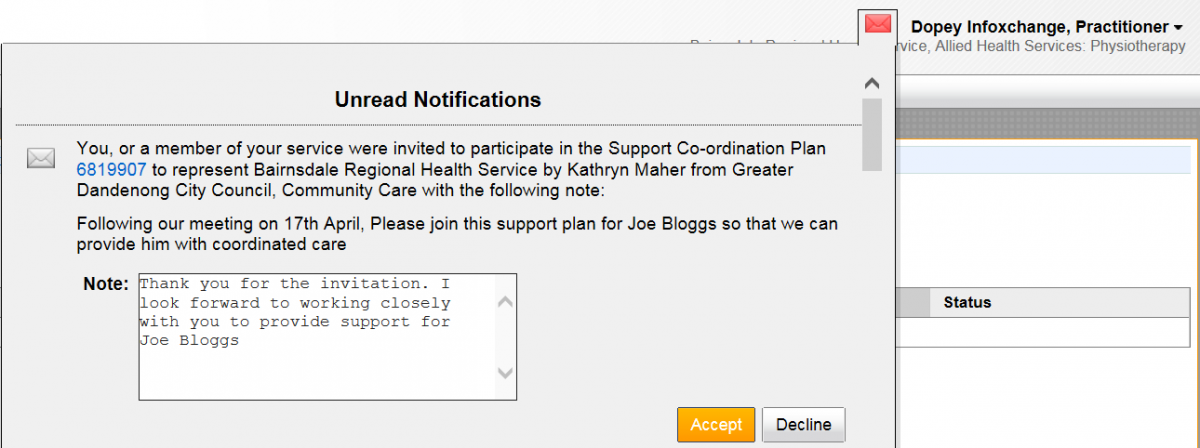
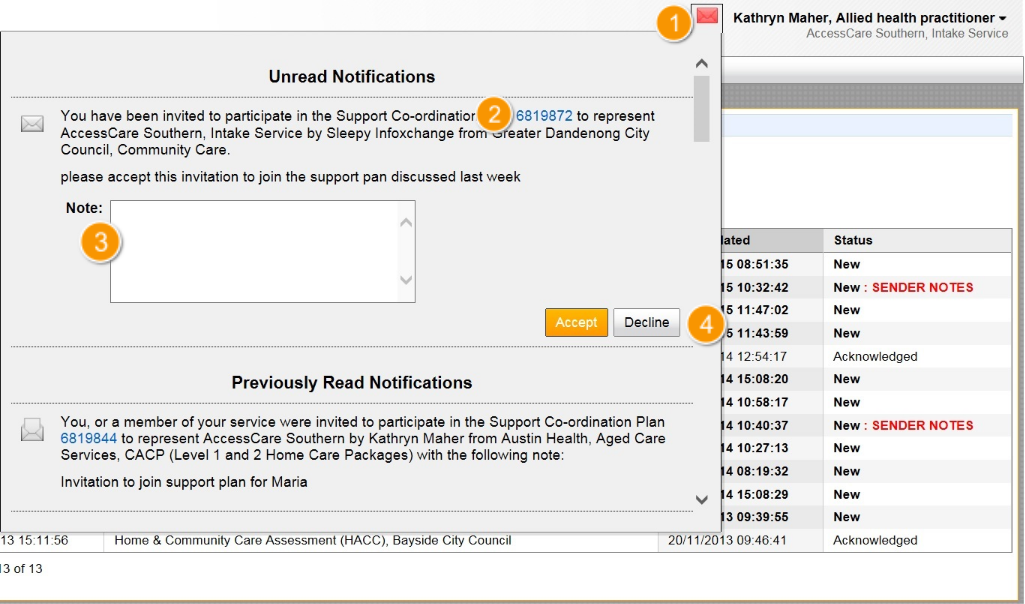
Along with receiving a notification email, the support plan participants also have an envelope next to their name in the eReferral system that turns red when a support plan notification is sent.
1. Just click on the red envelope and the unread notifications will display. Click on the envelope again to minimise the notifications.
2. Click on the support plan number in blue to view the support plan before or after accepting the support plan
3. You can write a note to the sender of the support plan invitation prior to accepting or declining the support plan
4. Click on Accept or Decline button to respond to the invitation. Once a support plan invitation is accepted, the participant is listed in the participant table.
Activity Panel
The activity panel records all revisions made to the plan.
1. By clicking on the Revision number in blue, you can go back to a previous version of the support plan.
2. As a support plan participant with edit access you are also able to manually add notes by typing in the free text field

3. Click on the 'Add Note' button or if you would like the other participants to be notified of your note, click on 'Add Note & Notify'. This will send the participants of the support plan an email and their envelope will turn red.
4. Even after adding a note, you are still able to edit that note

5. Click on 'Update' or 'Update & Notify' to complete the edit

Printing
Printing Support Plans
Print to PDF
The print to pdf function provides you with a clean, nicely formatted document that can be presented to clients and other people providing support.
From the view support plan screen, you can click on the 'Print for PDF' button.
Print Compressed View
The compressed view of the support plan is designed to reduce the size of the document so that it is suitable for print or fax.
1. Click on the 'Compressed View' tab
2. Tick the Check box 'Include notes' if you would like the activity notes from the support plan to be printed
3. Tick the Check box 'Include Revisions?' if you would like to print all the revisions that were made to the support plan
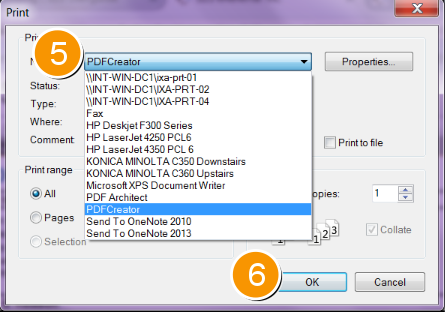
4. Click on the 'Print' button
5. Select the printer you would like to print to
6. Press 'OK'
Reports
Support Plan Reports
Service Records
The Service Records area holds a record of all the Sent, Received and Draft Referrals from the past 12 months for your service - regardless of their status.
To get to the Service Records area:
- Go to the Referral menu in the Top Menu Bar.
- Hover over Service Records.
- Click on either Sent or Received (or Drafts).
Client Records
Tab Overview
By default when you open a client record, you will be on the View Client tab. Below is a brief explanation of the other tabs:
Client History Tab
To view the history of changes made to the client's record, click on the Client History tab.
All changes made to client records and tracked and traced in eReferral. Everytime you click 'Save Client' when editing a client record, eReferral will create a revision history. The full revision history can be seen by going to the Client History tab from the Client Record.
If a client has been merged with another client record, it will show up in the client history. If you made a mistake in merging the two records, you can unmerge by clicking on Unmerge.

Merge a Client Record
The Merge Client function is used to merge two records that are actually the same person.
- Hover over Client in the top menu bar and select Merge.
- Under 1. Client to Merge enter the family name, given name and gender of the client that you want to merge (i.e the duplicate record that should no longer exist once you've merged). As you type, a list of clients matching that criteria will be generated.
- Once you've found the right client, select by clicking into the small circle to the left of the client name. More details will appear about this client on the right hand side.
- Under 2. Client to Merge Into follow the same steps above to find and select the client record you want to merge the client above into (i.e the record that will still exist once you've merged).
- Click Merge Clients from the Action Button Bar.

Add yourself as Case Manager
You can add yourself as a Case Manager for a client so that you can access their client record more quickly and be automatically notified if someone else sends a referral for them.
- Adding yourself as a Case Manager for a client means that you can access/open their client record without having to do a search. Once you have added yourself as a Case Manager, go to the Client menu and select 'My Clients'.
- If you leave the 'notifications' box checked you will also get an email notification every time someone else using S2S makes a change to that client's record, or sends a referral for that client.
FAQs about Case Managers

Add yourself as a Case Manager for a client
- Search for the client
- Open the client record
- Click on the Edit Client tab
- Scroll to the bottom of the page - look for the heading Case Managers. If there are any existing Case Managers, they will be listed here.
- Select your name from the drop-down box next to Add a Case Manager.
- Click Save Client.
Case Manager FAQs
Frequently asked questions about using the Case Managers option.
Do I have to be the client's actual Case Manager?
- No you don't. You might just work with them frequently and want to bypass having to do a search in eReferral to get to their client record.
What does the Notification tick mean?
- If you leave 'Notification' ticked when you add yourself as a Case Manager you will get an email notification every time another eReferral user makes a change to that client's record, or sends a referral on their behalf. If you don't want to get the notifications, untick the box.
Can there be more than one person selected as a Case Manager for a client?
- Yes. There can be multiple people added as a Case Manager for the same client - there is no maximum number of Case Managers in eReferral for a client.
Can someone else add me as a Case Manager?
- No. Only you can add (or remove yourself) as a Case Manager.
- You will be able to see a list of any other people who have added themselves as a Case Manager but you will not be able to remove them.
Client Alerts
Alerts can be created for the purpose of entering and tracking Incident information that is current or past regarding a specific client. Types of incidents that you might want to records are:
Safety
Violence Against Worker
Family Violence
Aggressive Behaviour
Self Harm
Suicidal Ideation
Health
Chronic Medical Condition
Medication
Financial
Debts Owing
Financial Support Provided
Legal
Warrant Pending
Legal Advice Recommended
Alerts can be created by clicking on the Create New Alert button next to the 'Create New Referral' and 'Create New Support Plan' buttons on the client form.

Once an Alert is created and is current, it will display on the client form. Current alerts will now also be sent with the client data when sending a referral. This includes sending Fax and PKI referrals.
Alerts that are no longer current should be closed and will no longer be sent in referrals for that client but you can access the closed alerts from the Client Alerts tab.
NSW Users Only
NSW users have some different options available in eReferral as it is centered around respite coordination and referrals are made via the RCG Groups.
Each NSW region (Mid North Coast and Southern) all use S2S eReferral in a slightly different way, and with slightly different forms.
The topic headings under this menu outline some specific information for NSW users.
Save RIPT As Final
You can save a RIPT without sending it as a referral.
If you need to save or update a RIPT and you don't want to send it as a referral to the RCG group, use the Save As Final option. This saves the RIPT as a 'Document' and not as a Referral.
Save As Final
- Fill in the RIPT (you don't need to select a Receiver).
- When you have finished, click Save As Final from the Action Button Bar.
- Ensure you have ticked the Consent check-box at the bottom of the form.
- Click OK to confirm you wish to save document as a final rather than send as a referral.

Copy Referrals or RIPTs
You can use Create Copy to make a copy of any existing document. It's just like doing a 'Save As'.
You can copy any 'saved' or 'sent' document in eReferral, whether it is a Referral or a RIPT or any other type of form. Use this function when you want to use most of the information contained in the original document, but don't want to have to retype it all.
To Create Copy
- Find and open the document you wish to copy (either do a search by Document ID# or go to the Client Record and click on the Client Documents tab).
- From the Document menu, select Create Copy.
- This is just like doing a 'Save As' - so now you will have an editable copy of the document open that you can update/change.
- When you have finished making your changes, you can either Send it as a Referral, or Save As Final.
Reports
Reports may be generated by any user with a role in the system. Some managers may have report level access only.
Generating Reports
- Go to Reports in the top menu bar.
- Select the desired report type by clicking on the circle to the left.
- Adjust the criteria on the right hand side. Dates can be adjusted to the desired range if the report allows a date range. Services and agencies can be included or excluded from a report if the user has access to more than one agency or service.
- Click on View Report to view the report online or Download Report to export the report in Excel format.


Trouble Shooting
This section provides some solutions for common queries or problems that might arise while using the eReferral system.
Can't access the S2S login page
Forgotten your password or username
Having trouble creating a password?
‘The system has detected that you are attempting to open S2S in multiple browser tabs or Windows’.
“Internet Explorer Can Not Display This Page”
Slow performance or display issues
Closing programs in Windows Task Manager
Using the Back Button
Using the back button that is a part of the web browser will sometimes lead to system errors. Do not use this button, instead it is recommended that you navigate your way through the system using the available menu options, tabs or yellow buttons.
Scanning Documents
The following scanner settings are recommended when attaching a scanned document to a referral:
- Black and white image.
- 72 – 200 dpi resolution.
Please note that images scanned at more than 200 dpi will have its edges clipped when printed directly from the eReferral system. To effectively print such documents, first save the file to the hard drive and then print.
Can't access the S2S login page
Infoxchange updated its security settings for all its applications to meet Australian Government standards.
Our applications now require that the TLS 1.2 security protocol is enabled.
There are 2 ways in which users can be affected if the TLS 1.2 security protocol is not enabled on their PC/Server:
1. Using vulnerable browser/s (old versions)
The solution is to ensure you have the latest versions of the relative Browsers.
For Windows that would be:
a. Internet Explorer Version 11.0.96
b. Google Chrome (we recommend the latest version)
c. FireFox (we recommend the latest version)
For Mac iPad - it should be running the latest (at least iOS 9 (or later)).
You may be able to update the browser yourself or if you have an IT provider please ask them to upgrade browsers to the latest versions (and/or enable the TLS 1.2 security protocol.
For instructions on how to enable the TLS 1.2 security protocol please refer to the following link.
https://knowledge.geotrust.com/support/knowledge-base/index?page=content&id=INFO3299&pmv=print&actp=PRINT
2. Your agencies Firewall may be removing the TLS 1.2 security protocol.
a. Please ask your IT Department to:
i. Check any firewalls to ensure the TLS 1.2 security protocol is not being stripped out.
ii. "White List" our login page so it is accepted by your Firewall.
Note – if you are affected your system is possibly susceptible to attacks or invasion of privacy so this should be reported to your IT Department regardless.
If after trying these processes you are still having trouble, please have your IT Department contact us.
Login/Password Issues
Forgotten your password or username
Click here https://profiles.infoxchangeapps.net.au/forgot_password/request/s2s-referral/
Can’t find the Log in page
Click on “Support Home” at the top of this page. They are listed on the right hand side of the page under, Login to S2S ...
Can’t log in
- Ensure you are logging into the correct website and using the correct Login link (see "Can’t find the Log in page" above).
-
Username and password error.
- Click on Forgotten your password? located on the log in page.
-
Contact Infoxchange support at 03 9418 7466 or apps@infoxchange.net.au if:
- Your email address is not unique to you.
- You are not sure what email address is associated with your account.
Having trouble creating a password?
-
Requirements
- are case sensitive.
- should be a minimum of 8 characters and max of 12.
- must contain at least one number, one upper case letter, and one lower case letter.
- can’t be an English word, name or anything out of the dictionary.
- no sequences such as 1,2,3,4 or a,b,c,d or identical characters such as 111111.
- can’t base it on your username.
-
Use some of these ideas for a good password that is easy to remember,
- acronyms, i.e. Always Look On The Bright Side Of Life = Alotbsol1
- phrases, No9ismybus
- a combination of two “half” names i.e. Jenjac25
- include dashes or forward slashes etc.
- Never share your password.
Remove saved/pre filled passwords
To delete individual passwords:
- Highlight the username that displays there, and press the Delete key to remove just that one username/password combination from IE.
- Internet Explorer will then prompt you to confirm that you do want to delete it.
To delete ALL saved passwords:
- Clearing the cache will remove ALL existing saved passwords
Autosave passwords:
- Tools > Internet Options > Content > Autocomplete > Settings
- Untick usernames and passwords on form
Google Chrome
- Open the Chrome menu using the button on the far right of the browser toolbar
- Choose Settings
- Click Show advanced settings at the bottom of the page
- Click Manage saved passwords in the “Passwords and forms” section
- Select from the list the password you wish to remove
- Select Finished
FireFox
- Go to Tools > Options > Security
- Select Saved Passwords
- If you wish to see the saved password select Show Passwords
- If you wish to delete a password select the site you wish to remove the password from and select Remove
Safari
- Open the Safari menu
- Select Preferences
- Switch to the Autofill tab
- Click the Edit button for Usernames and Passwords
- Delete the entry that corresponds with the site you want to remove
Error Messages
‘The system has detected that you are attempting to open S2S in multiple browser tabs or Windows’.
“Internet Explorer Can Not Display This Page”
- Check internet connection
- Check you are on the correct website
- Delete cookies/cache
- Close and restart your browser (Internet Explorer etc)
- Restart your PC
- Contact your IT Dept or Infoxchange Online Support if still unable to display the webpage
Slow performance or display issues
Update your Internet Browser to ensure you are running the latest version. We support the last three versions of each browser.
Click on this link to determine your internet download and upload speeds http://www.speedtest.net/
- Select BEGIN TEST
- Download Speed ?/100Mbps
- Upload Speed ?/100Mbps
What browser am l using?
Clearing the Cache
- Untick preserve favourites to completely clear the cache or tick if you want to keep favourites.
- Tick the next three items after preserve favourites and leave the rest unticked.
- Tick the first five items for clearing active logins, or first four to retain logins.
- Tick the first four items
Closing programs in Windows Task Manager
- Right mouse click on the Task Bar or Alt-Ctrl-Del and select Start Task Manager
- Select Applications tab where a list of open programs are displayed.
- Select the program e.g. S2S eReferral VIC - Internet Explorer
- Select End Task
Allow 3rd Party Cookies
- Go to Tools > Internet Options > Privacy tab
- Click Advanced button
- Make sure Accept is selected for 3rd party cookies
- Go to Tools > Options > Privacy tab
- Make sure it says Firefox will remember History
- Go to Menu on top right > Settings
- Click Show advanced settings
- Under Privacy click Content settings
- Make sure the option Allow local data to be set (recommended) is selected.
- Make sure the checkbox labelled Block third-party cookies and site data is unchecked.
- Click Safari in the menu bar.
- Click Preferences
- Click the Privacy panel.
- For the option Block cookies and other website data, select Never.
Add Trusted Sites
Internet Explorer (IE)
- Copy URL (web address) e.g. https://www.s2s.org.au
- Select Tools > Internet Options
- Select Security tab
- In Select a zone to view or change security settings Trusted Sites
- Select Sites
- Paste URL into Add this website to the zone and select Add
- Select Close and OK
Google Chrome
- Click the 3 horizontal lines icon on the far right of the Address bar.
- Click on Settings, scroll to the bottom and click the Show Advanced Settings link.
- Click on Change proxy settings under Network
- Click the Security tab > Trusted Sites icon, then click Sites.
- Enter the URL of your Trusted Site, then click Add.
FireFox
- Click the 3 horizontal lines icon on the far right of the Address bar.
- Click on Settings, scroll to the bottom and click the Show Advanced Settings link.
- Click the Security tab > Trusted Sites icon, then click Sites.
- Enter the URL of your Trusted Site, then click Add.
Safari
- Right-click the link (or press Control while clicking the link).
- Select Add link to Bookmarks... .
- Under "Add this page to:" click the arrow for the drop-down menu.
- Select Top Sites.
- Click the Add button.