Create & Send an eReferral
Overview
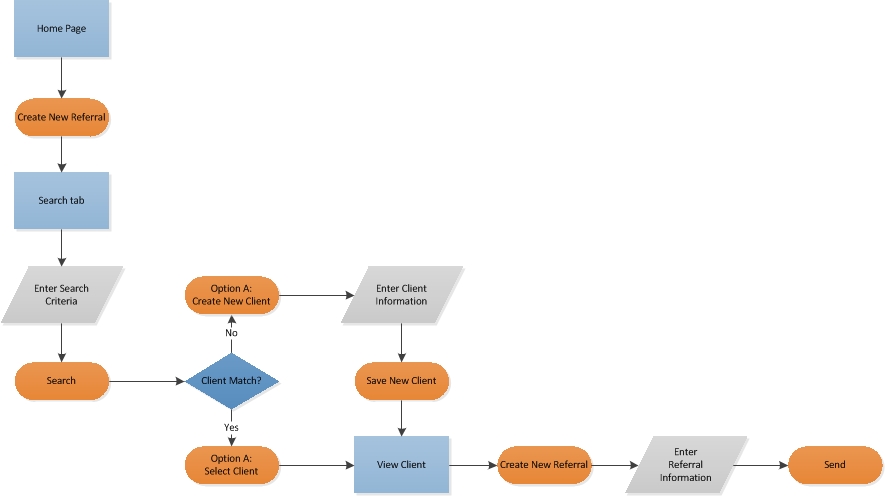
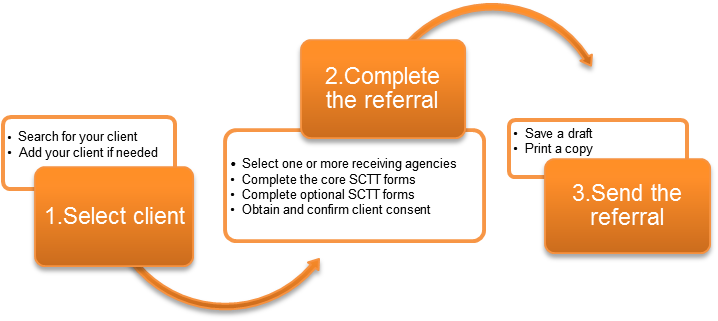
There are three main steps when creating an S2S referral, however there are variables with each referral – such as which SCTT forms need to be completed. The diagram below shows you the three main steps and highlights some of the variables. The remainder of this section details how to complete each step.
Step 1: Select Client
The first step is to select a client ... and it all starts with a Search!
Before creating a new referral you need to run a SEARCH to check if the client is already on the S2S system. It's important to do this so that multiple records aren't created for the same person.
If you can't find your client, you need to add them (refer to Step 1b: Add New Client).
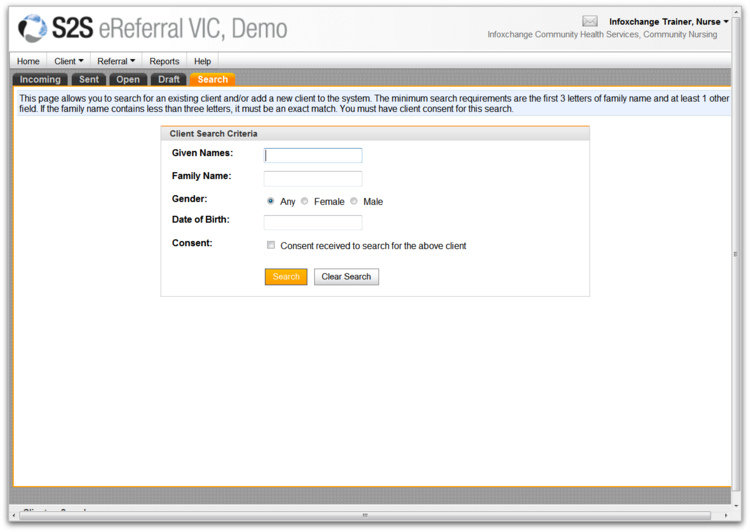
Search for a client and create a new referral
- Go to the Client menu and select Search/New OR Click on the Search tab.
- Enter Search criteria.
- Tick the 'Consent to search for the above client' box.
- Click Search.
- A list of all clients matching your search criteria will be generated in a table underneath.
- If you can see the client you're looking for, select the client by clicking once anywhere in the row - this will open the client's record.
- Once you've selected your client, click Create New Referral from the action button bar.
- Congratulations! That's the first main step finished.
 We recommend that you only use the first three letters of the given and family name as existing records may have mis-spelt names. If you're sure the client you are looking for is already in the system, try transposing the given and family name, as they may been entered like this by mistake.
Step 1b: Add New Client
You can’t add a new client until you have done a search. Once you have run a search, there are two places you can add a new client from.
- The Search page (after you have run a Search) - select Create New Client.
- The View Client page (once you have opened a client record), select Create New Client with Same Name.
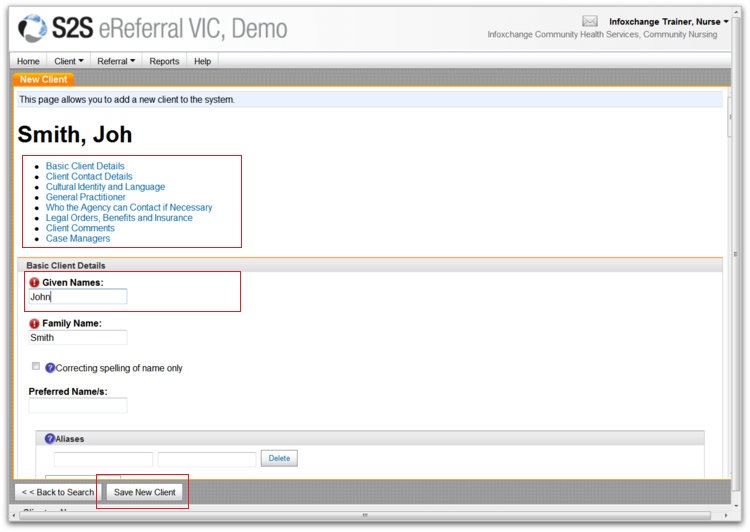
Adding and saving a new client record
- Fill in the Client details by clicking into the text boxes.
> Scroll down or use the blue hyperlinks to move down the page.
> Fields with a red exclamation mark must be completed. - When you have finished, click Save New Client.
- The client data will be saved and will load the full set of Client Record tabs. You can edit and save more client details, or add an alert if necessary.
- When you are ready, click Create New Referral.
- Congratulations! That’s the first main step finished.
Step 2: Complete Referral
The second step of creating an eReferral is to fill in the referral information.
In this step you must:
- Select a receiving agency and service.
- Obtain and confirm client consent.
- Complete or attach the core SCTT forms (Coversheet, Summary and Information) as a minimum.
- Complete or attach any optional or supplementary SCTT forms as required.
Once you have completed Step 1: Select a client, the default referral form will open. The left hand vertical menu panel displays the different sections of the referral. As you enter information in the various sections, green ticks will appear – this doesn’t necessarily mean that all the information has been completed, just that the section has been filled out to some extent.
Helpful hints for referrals
- You can select more than one receiver for the same referral.
- You don't have to complete your whole referral in one go, but you must Save As Draft first.
- It is good practice to Save As Draft at regular intervals to prevent you from losing your work in the event that your internet connection is disrupted.
- Throughout the referral sections, you can access more helpful hints by hovering over the blue&white question mark symbols with your mouse.
Step 2.1: Select Receiver
Referrals may be sent via the eReferral system using one of three methods.
- Standard eReferral: Electronic referral to member agencies fully registered with the S2S system.
- Fax referral: Using the FAX gateway.
- Email referral: Secure email using the PKI email facility.
eReferrals
To use the eReferral sending method, the receiving agency must be registered with the S2S system.
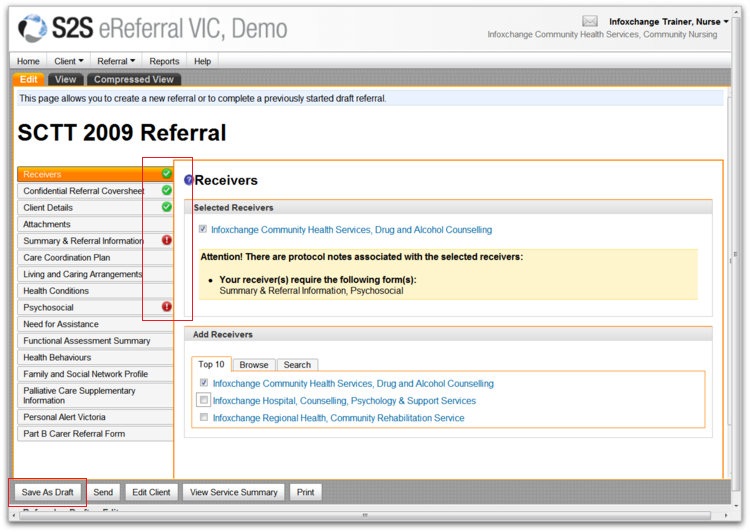
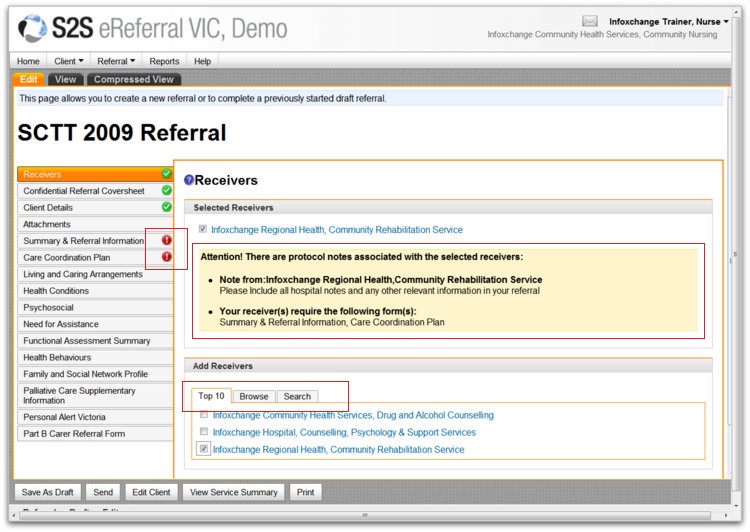
To select a registered agency, look under the Add Receivers heading at the first 2 tabs; Top 10, and Browse.
Top 10
Lists the 10 providers that your service has sent the most referrals to. If the correct agency/service is in this list, simply put a tick in the tick-box.
Browse
Click the Browse tab to list regions, and the S2S member agencies will appear. Tick the box next to the service you wish to refer to and it will appear in the selected receivers area above.
NB: A Receiver can specifiy protocols for 'required' information. Once a receiver is ticked, if they do have any protocols/minimum information requirements, red exclamation marks will sign-post required SCTT forms.
Fax and Email Receivers
Fax Referrals
- The fax gateway allows referrals to be sent via fax straight from the system to a direct, secure, fax number (i.e. you do not need to use a fax machine).
- Attachments cannot be sent using the Fax referral method. Any attachments will need to be faxed separately.
Email Referrals
- The PKI facility allows referrals to be emailed to services with a secure PKI facility installed. You can also use this to send referrals to the GP network and to RDNS. See RDNS and HL7 Referrals.
- Attachments can be sent using the PKI email facility.
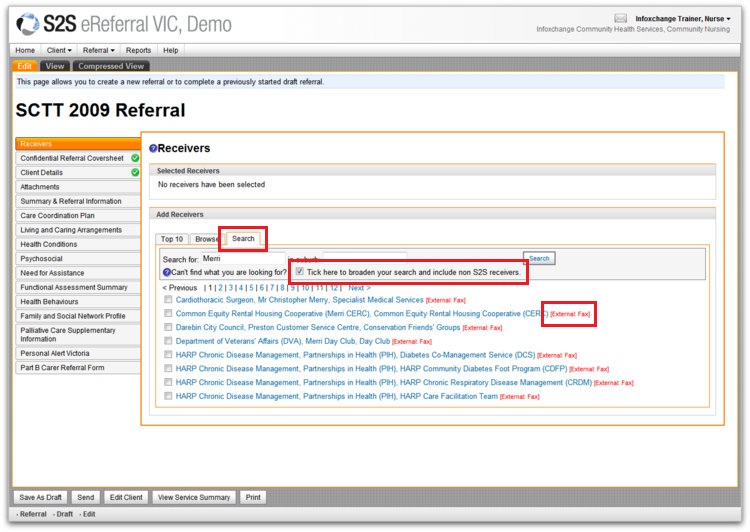
If the agency you need to send to is NOT registered in the S2S system, you will have to go to the Search tab and use either the Fax or Email Referral method.
From the Search tab
- Enter the name of the agency you wish to search for.
- Enter the suburb (optional).
- Put a tick in the checkbox to ‘include non S2S receivers’.
- Click Search.
- A list of receivers will appear. If the receiver appears, select it, OR run another Search.
NB: Once you have found the agency/service – the eReferral system will show which method of sending is available for that particular agency. It will either show ‘External: Fax’ or ‘External: PKI’ in red next to the listing.
RDNS Receivers
To send a referral to RDNS:
- Click on the Search button from the Select Receivers area and enter Royal District Nursing Service or RDNS
- Tick the check box that says ‘Tick here to broaden your search and include non S2S receivers’.
- Click Search. Services are listed with the [External: PKI-email] at the end - ensure you select [External: PKI-email] NOT [External: Fax]
- Tick the check box next to the name.
HL7 Receivers (GPs)
To send a referral to a GP:
- Click on the Search button from the Select Receivers area and enter the name of the receiving GP. For example, Dr Heenetigala.
- Tick the check box that says ‘Tick here to broaden your search and include non S2S receivers’.
- Click Search. GPs are listed with the [External: HL7-email] at the end.
- Tick the check box next to the name.
Please note that you cannot attach documents to referrals sent to GPs.

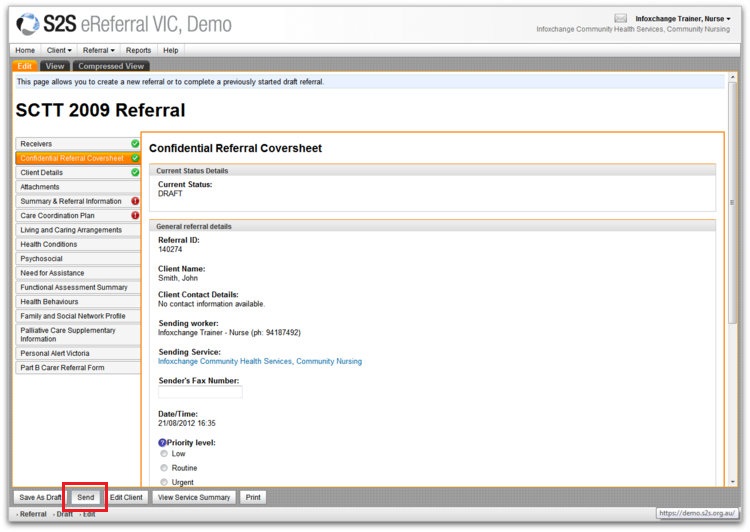
Step 2.2: Coversheet
This is a core form that contains required fields.
Regardless of whether you have your own way of producing completed SCTT forms to add as attachments, this coversheet must be filled out. To fill out the coversheet, select the second option of the left hand vertical menu panel.
The current status details of the Coversheet will show you if the referral is a DRAFT (it will be if it’s a newly created referral), or a status of a sent/received referral.
The following sections of the Coversheet are required:
1. Priority level of the referral
» Low: During peak demand, low should be selected.
» Routine: Referrals with a priority of routine will be attended to in date order.
» Urgent: Urgent suggests that the client cannot wait.
» Renewal (ACAS): This option is for ACAS assessments only.
2. Information Access Level of the referral
» Standard: The referral information can be accessed with client consent.
» Limited: Only the referral event may be accessed with client consent as the details are hidden. Users can search for the referral with client consent. They can see that a referral occurred, but cannot open it.
» Sender /Receiver Only: Only the sender and receiver can see that the referral has occurred. Any other user trying to access the referral will not find a record of it.
3. Consent
To send the eReferral, you must have gained consent from the client. You can download the consumer consent to share tool template from the Coversheet and ask the client to sign it so that you may file the form as evidence.
4. Feedback Required
This box is pre-ticked by default. You will continue to receive feedback about this referral after it has been accepted. Un-tick this box if you do not wish to receive feedback.
5. Referral Notes
Record any notes as part of the referral, such as the purpose of the referral. One sentence will suffice.

Step 2.3: SCTT Forms
SCTT forms can be completed online in eReferral, or added as attachments from your own client management system.
Online SCTT Forms
- There are ten online SCTT forms.
- The Summary & Referral Information is a core SCTT form.
- The rest are optional/supplementary.
- Simply click on the form you wish to complete and fill out as required.

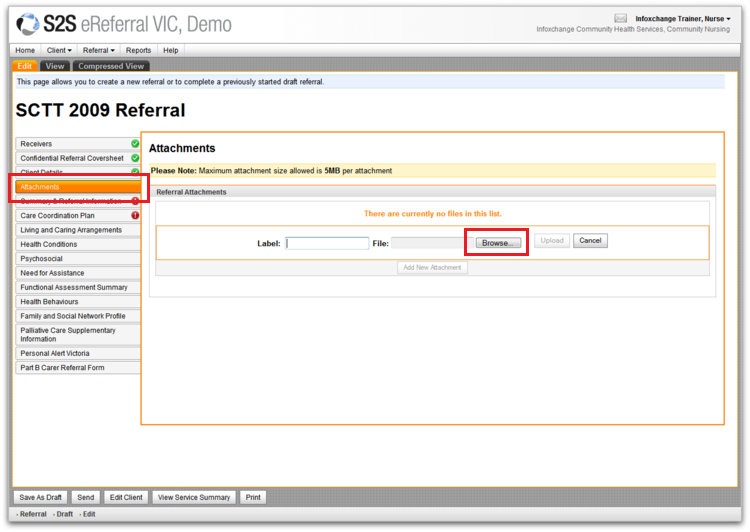
Attach SCTT forms
You can add your own SCTT attachments if you have already completed them in your organisation's client management system. You will need to save the file into an appropriate format to send as an attachment prior to commencing the referral process.
- Click on Attachments from the left hand vertical panel menu.
- Click on Add New Attachment.
- Type the SCTT template name you will attach in the Label field (e.g. Psychosocial)
- Click Browse and locate the document you wish to attach.
- The ‘file’ field will automatically populate with the filename of the document you are attaching.
- Click Upload. Repeat the process as necessary. You can add as many attachments as you like.
- You can add, delete or open attachments at any time by clicking the buttons in the options in the area.
Step 3: Send Referral
The final step to creating a referral is to send it!
- Click on the Send button to complete the process.
- Click OK when you see the prompt that asks if you wish to send the referral.
- Once you have sent the referral, you can see that it was sent successfully.
- The left hand vertical panel will now only show the sections of the referral that you added information to.
- It is useful to record the referral ID number. You can enter it into your client management system, or you can print and file the referral.
- The referral will now show up in the ‘Sent’ referrals tab which can be accessed from the Home page.
NB: If you forgot to check the Client Consent tick-box, the system will display a prompt. Simply click OK and S2S will take you to the exact spot on the Coversheet form where you need to check the tick-box.
Draft eReferral
The Draft tab lists referrals that you have started, but not sent.
At any time while creating a referral and before sending it, clicking on Save As Draft enables you to come back to it to send at a later date.
From this area, a referral may be completed and sent or it may be discarded.
To complete and send the referral click on the referral from the Draft section and complete the steps remaining under Creating an eReferral.
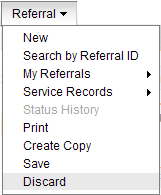
Discarding a Referral
To discard a referral, follow the steps below:
- Click on a referral in the draft tab.
- The Edit Referral page will be displayed.
- Hover over Referral menu from the Top Menu Bar.
- Select Discard
- Click OK if you wish to proceed to discard the referral. This action cannot be undone.
Send eReferral Process